Flyduino Kiss FC/ESC manual

GUI installation
The KISS GUI can be downloaded from the KISS download page for almost all systems.
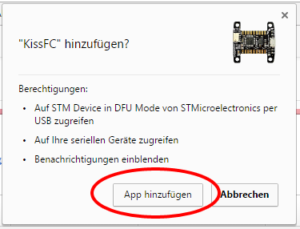
… as a Google Chrome extension
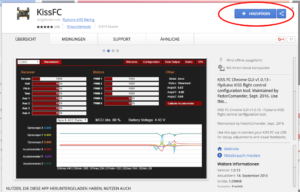
Add App
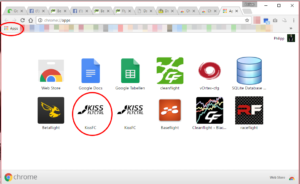
Start App
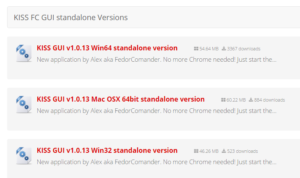
… as standalone for Mac and Windows
… as Android App

to the download of the Android App
Installation:
- download .apk
- Accept installation from unknown sources
- Installation
Start screen
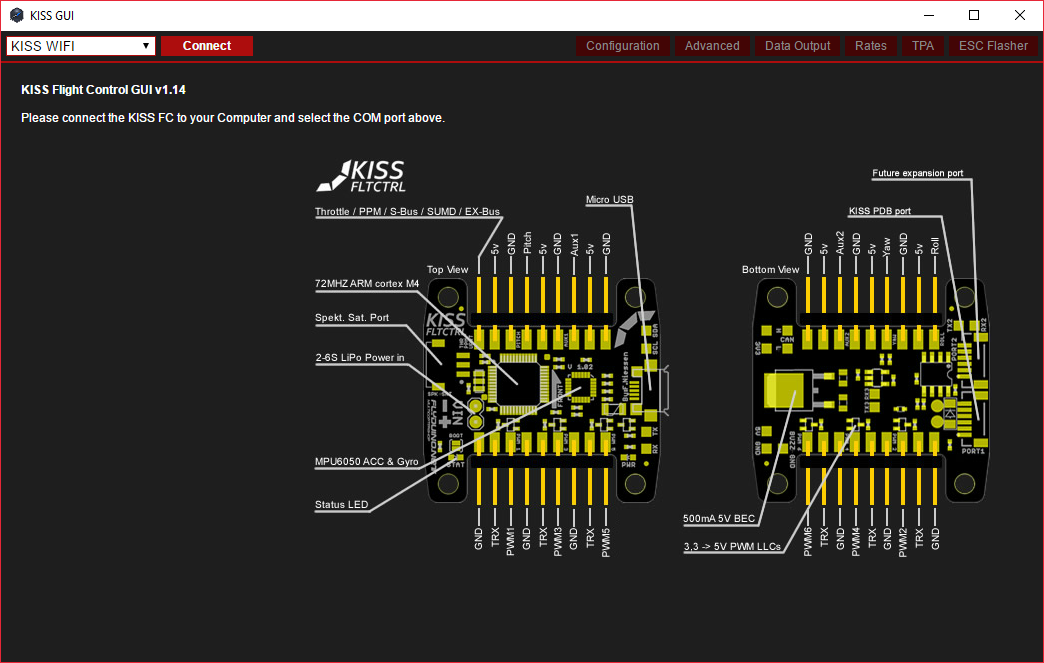
This is the start screen which looks the same on all devices. In the middle you find a representation of both sides of the KISS FC and how to connect the individual components to it.
Tab: Configuration
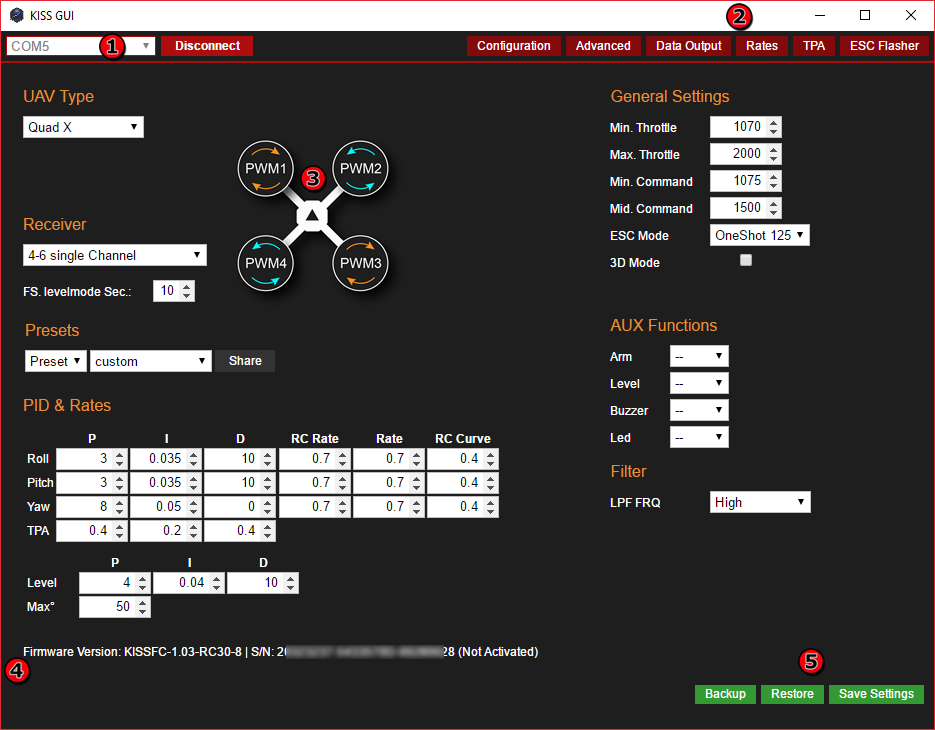
 Once you have connected your KISS FC via USB, a new com port will appear in the drop-down menu. Here you have to select the correct port
 Here you find more tabs, which I will explain below
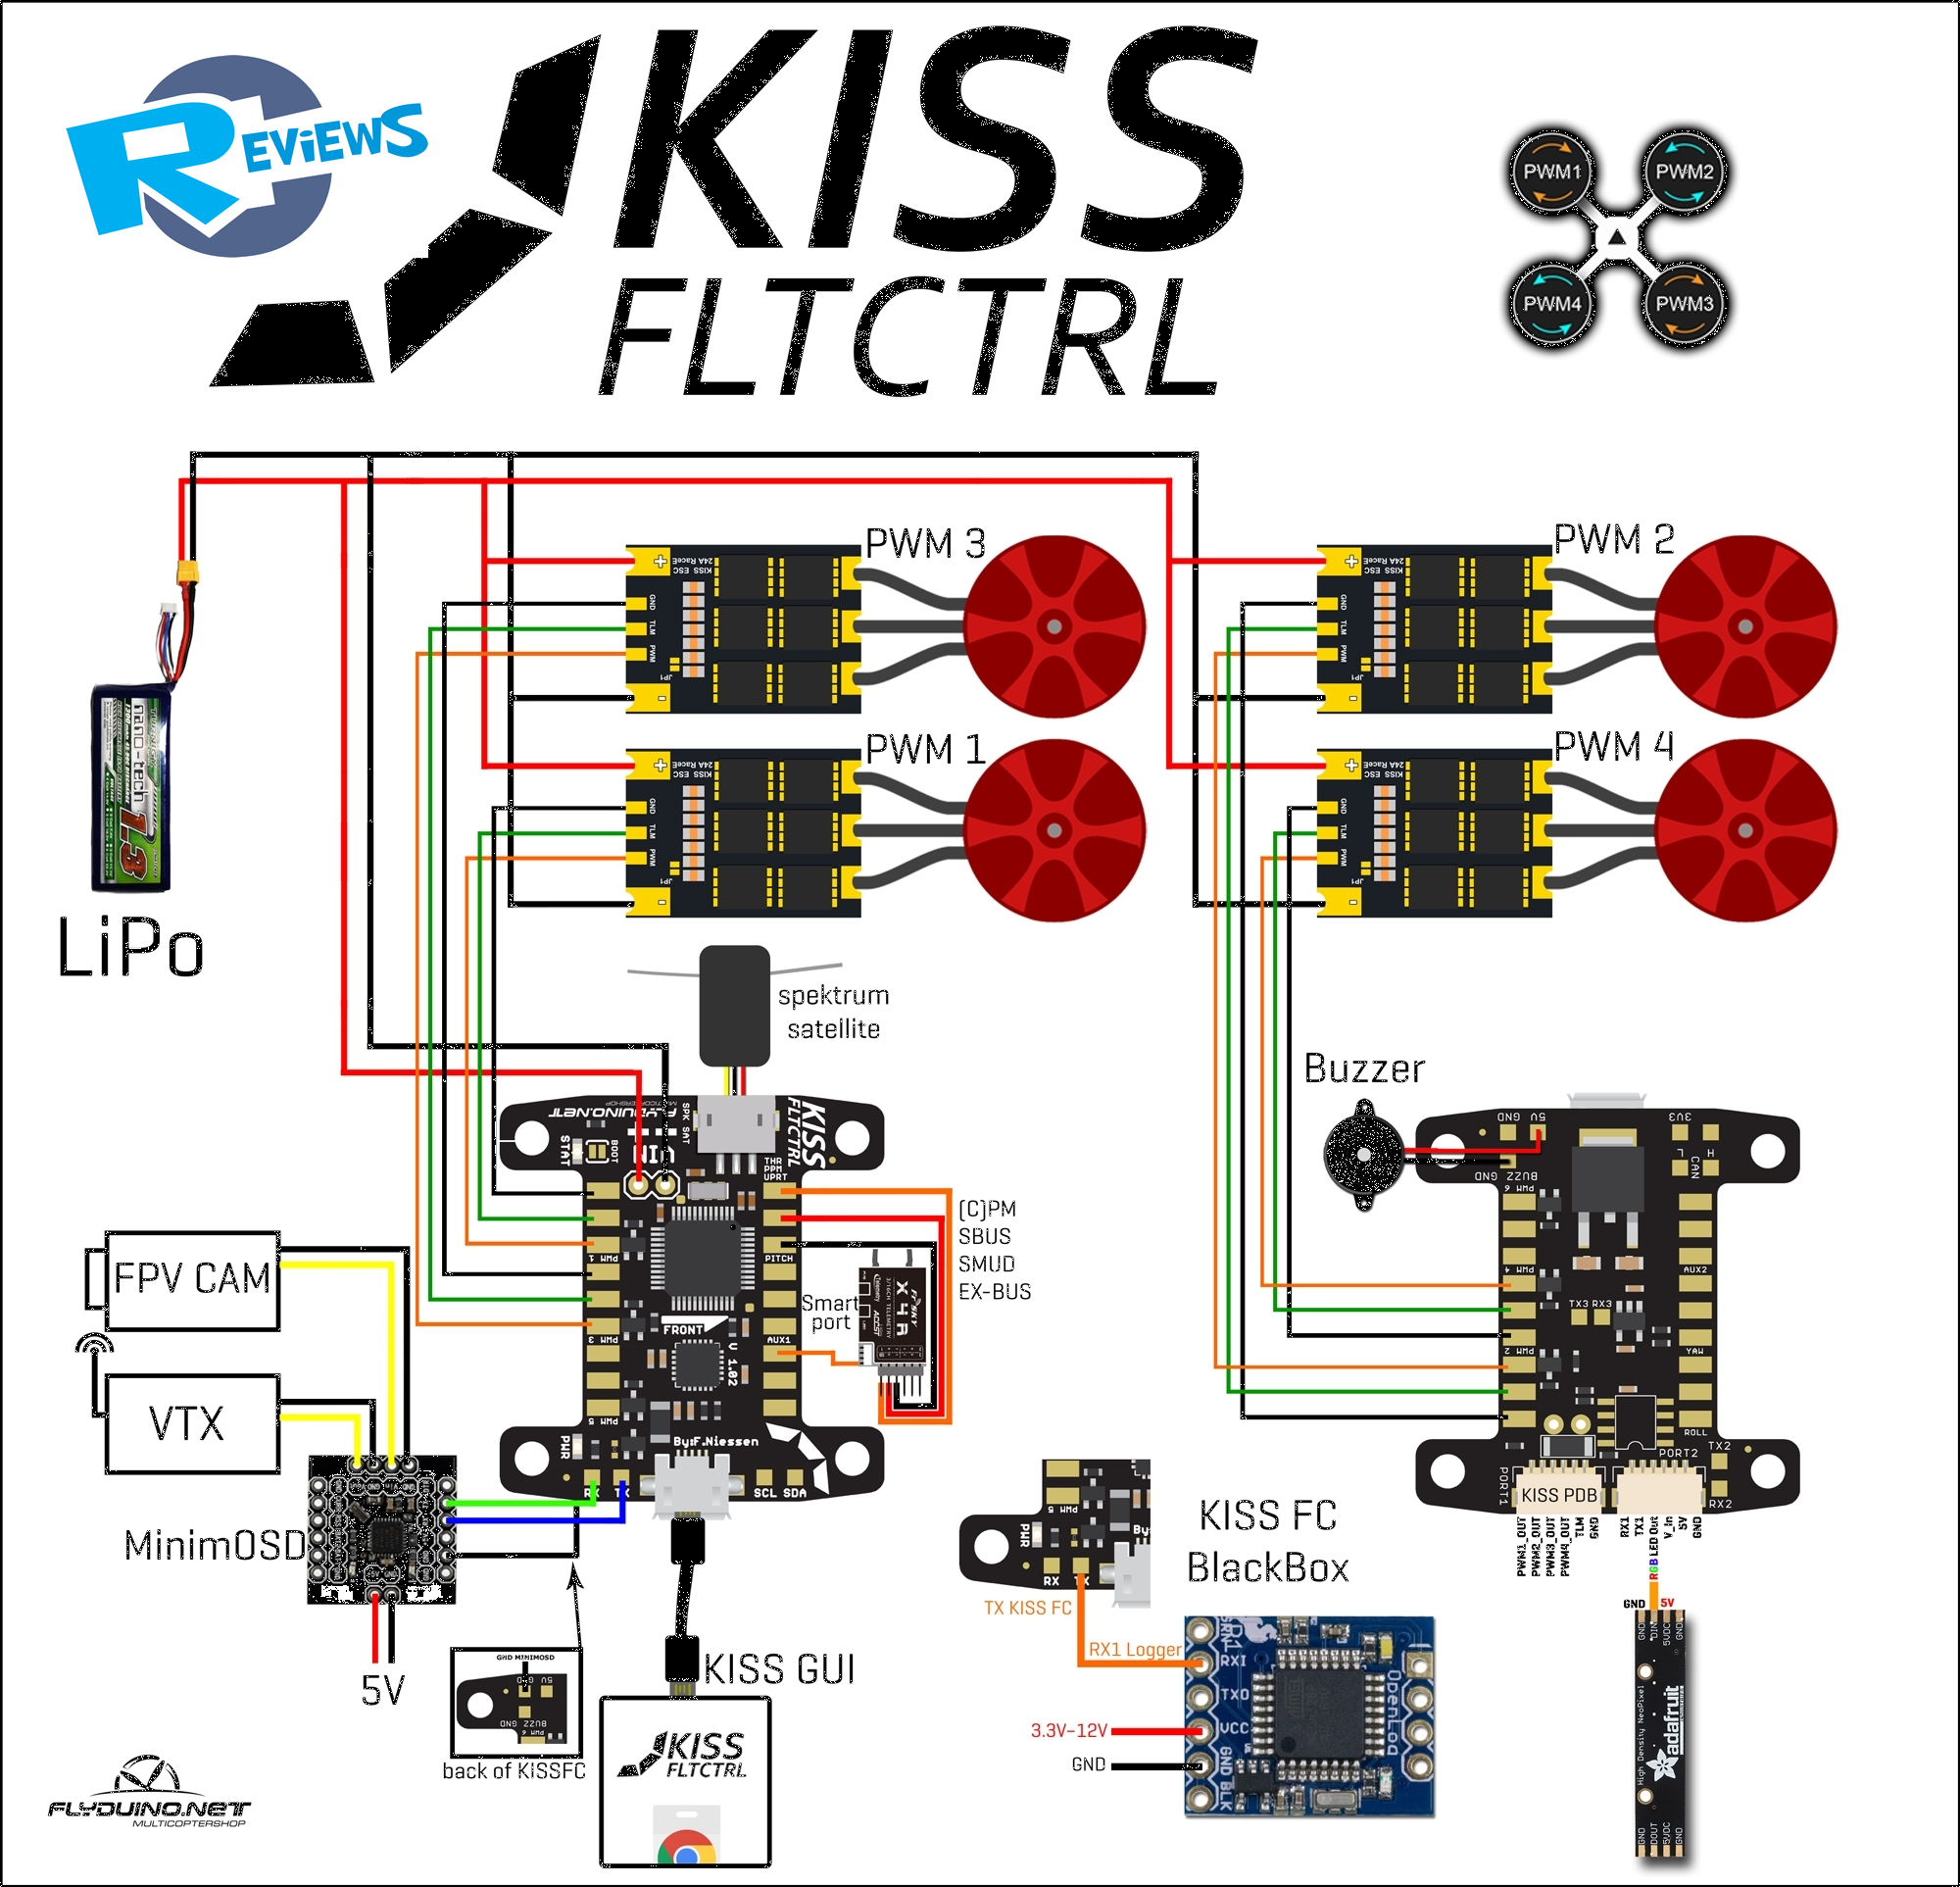
 After the following scheme you have to solder the motors to the KISS FC
 Here you can find your current firmware version and serial number and whether your KISS FC is activated, or not
 Backup: Restore all settings as a file, Restore: Restore settings from file Save Settings: Save changes to the settings
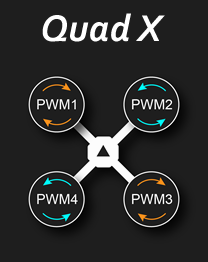
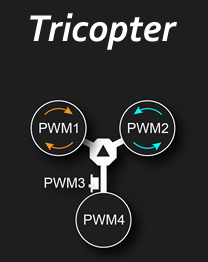
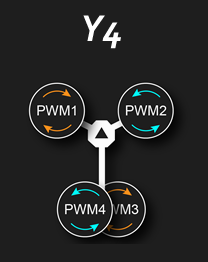
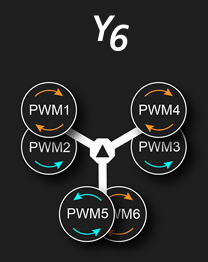
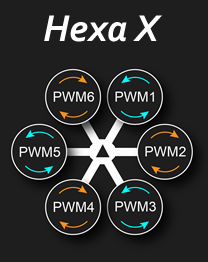
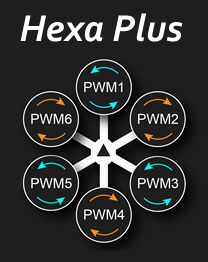
UAV Type
In this menu, you decide which type of copter you want to fly.
Standard is: Quad X
Pay attention to the direction of rotation and the correct PWM output when mounting the motors. It is also important to ensure that the flight control is correctly aligned with the flight direction arrow.
You can find a connection plan here:
Receiver
Depending on what receiver you are using, you can select the appropriate one from this drop-down menu. PPM channel order can be found in all combinations. A Crossfire MicroRx must by the way be configured as PPM or Futaba.
- 4–6 single Channel
- PPM: Thr, Roll, Pitch, Yaw
- PPM: Pitch, Thr., Roll, Yaw
- PPM: Thr, Pitch, Yaw, Roll
- PPM: Roll, Pitch, Yaw, Thr.
- PPM: Pitch, Roll, Thr., Yaw
- PPM: Roll, Pitch, Thr., Yaw
- Spekt Sat DSM2
- Spekt Sat DSMX
- FrSky S-BUS
- FrSky S-BUS (not inverted)
- Gr. SUMD
- Jeti Ex Bus
- Futaba S-Bus
- Multiplex SRXL
PID & Rates
Here you can adjust your PIDs and Rates as usual. There is also an extra tab for rates. No matter which of the two menus you change the counters, they are the same in both places.
Presents
Flyduino has created an online database for User-PIDs. Through this database, each user can share their PIDs with the community and, if necessary, load PIDs from the community directly into the KISS FC.
General Settings
Min Throttle
minimum throttle value for the motors
Max Throttle
maximum throttle value for the motors
Min Command
the throttle value from which the PID controller starts to operate
Mid Command
ESC throttle value for switching the direction of rotation in 3D-mode
ESC Mode
Select ESC Signal protocol: Oneshot42, Oneshot125, PWM, (Dshot150, Dshot300, Dshot600 if ESCs supported this)
3D Mode
is here a check mark, the 3D mode is activated, for which of course you still need special 3D ESCs
ESCs calibration
KISS24 ESCs no need to be calibrated.
Always perform this process without the propellers!
- the state “Disarmed” is always 1000 for KISS FC
- connect FC with PC Connect and “Min Throttle” to 2000
- arm the KISS FC with your transmitter but without LiPo
- now, connect the LiPo (beep sound)
- disarm (beep sound)
- disconnect LiPo connection (beep sound)
- set “Min Throttle” to the desired value (e.g., 1070)
Airmode
To activate Airmode: Set “Min Command” to 1000 and arming with an AUX channel
AUX Functions
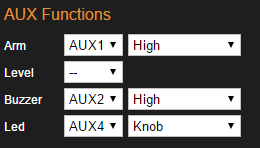
Here you can configure up to four AUX channels.
The following selection options are available
- ARM – Arm/Disarm
- Level – activate Angle/Level-Mode
- 3D – activate 3D-Mode
- Buzzer – activate Buzzer (if you are looking for your quad in the high grass, for example)
- LED – LED ON/OFF/COLOR
An AUX channel can be assigned to each of the above-mentioned alternatives, as well as a value:
- Low + Medium (In the vicinity of 1000–1500)
- Medium (In the vicinity of 1500)
- Medium + High (In the vicinity of 1500–2000)
- High (In the vicinity of 2000)
- Knob (only for LED)
Filter
LPF FRQ: Adjust low pass filter against oscillations
- Off
- High (geringste Filterung)
- Medium High
- Medium
- Medium Low
- Low
- Very Low (höchste Filterung)
Advanced
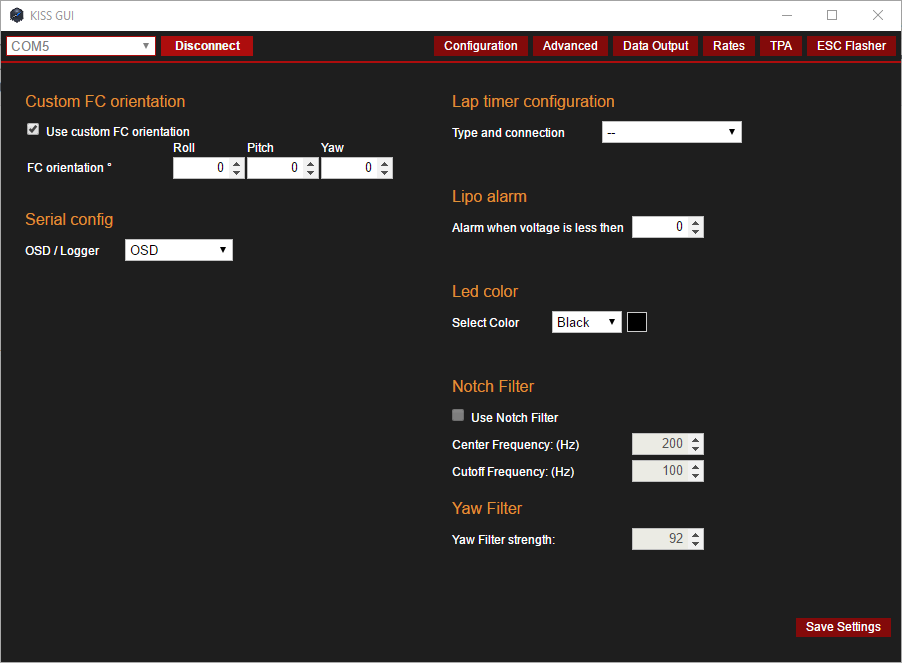
Custom FC orientation
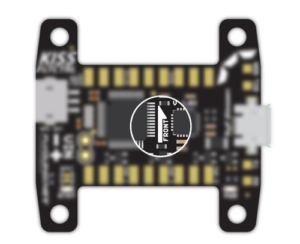
If you do not want your KISS FC to be aligned with the direction of the arrow in the direction of the flight, you can turn the KISS FC under this menu. You can specify a positive or negative angle on each axis.
Negative = turned to the left
Positive = turned to the right
Serial Config
In “Serial Config”, for example, you can select whether you want to run an OSD on the serial port.
Kiss MinimOSD
KISS MinimOSD Firmware
Manual
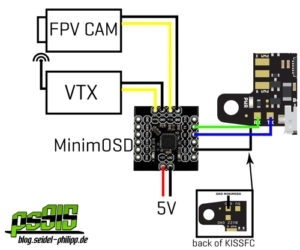
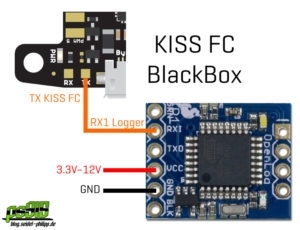
In addition, a serial logger can be fed with data.
The following data can be logged in a “resolution” of 10–100%:
- Raw Gyroscope
- Raw Accelerometer
- ESC Voltage
- ESC Current
- ESC Temperature
- ESC RPM
- ESC Consumption
Blackbox/ Logger Hardware: Flyduino (OpenLog)
Storage medium: A Class 10 MicroSD Card is recommended
Log Viewer: Cleanflight – Blackbox Explorer (Google Chrome extension)
Lap Timer
With an IR LED and a 30 Ohm resistor, you can use the EasyRaceLapTimer.

The following outputs can be used: Buzzer Pin, PWM5 Pin, PWM6 Pin
Lipo Alarm
Lipo Warning if the set limit is exceeded. Adjustable range is 0–26 V.
LED Color
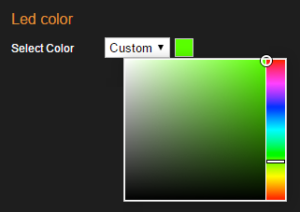
The following colors can be selected.
Black, White, Yellow, Orange, Red, Purple, Blue, Green, Cyan, Custom
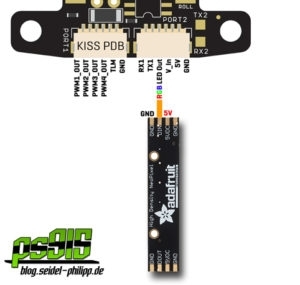
The LED is connected as follows. It is recommended to choose an external and sufficiently dimensioned 5 V voltage source.
Here the complete KISS FC connection plan.
Notch Filter
The Notch Filter is only needed to filter a certain small range of frequencies where vibrations might occur.
Only then you should activate it and adjust it by inspecting the BB log files.
Center frequency is the center of the range you want to filter.
Cutoff frequency adjusts the frequency range above and below the center
Example
filtered range = lowest freq to center − lowest + center
filtered range = 300 to (400 − 300) + 400 = 500, so range is 300 − 500Hz
Yaw Filter
YAW filter strength targets the amount of influence, the filter has on YAW.
This filter was introduced to get rid of grinding noises that might occur on certain setups.
It is independent from the main notch filter.
At 0 the filter is off. The filter acts exponentially so the higher the strength, the more filtering.
Example
setting the filter from 92% to 97% will affect the filtering more than going from 50% to 60%
Mix value = old value x (0%) + new value x (100-0%)
Tab: Data Output
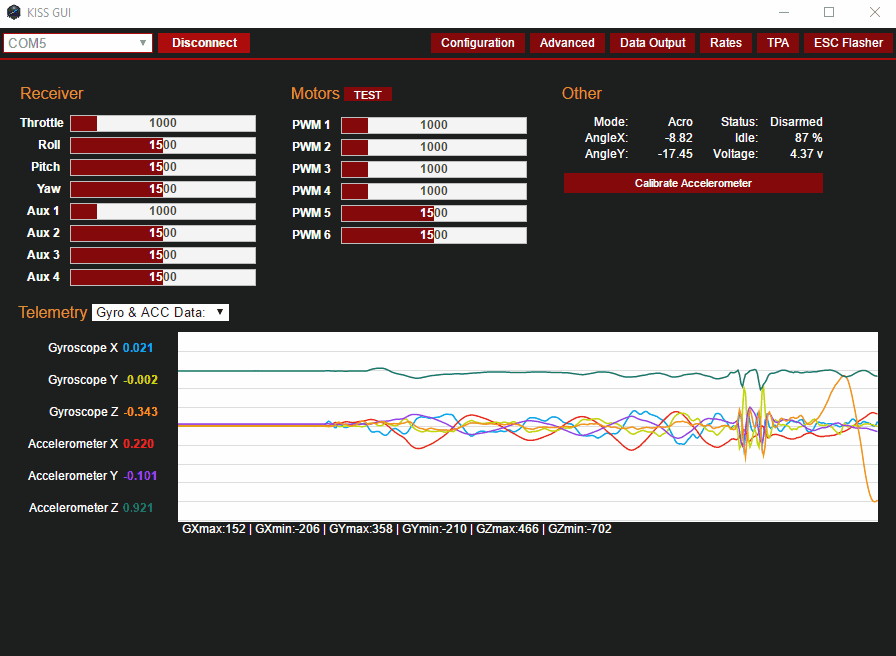
Under “Data Output” you can see various sensors and information such as the LiPo voltage, MCU calculation, angle in which the flight controller is located and much more.
Receiver: Here you can check whether your channels are correctly assigned and the embroidery paths work correctly
Other: Mode: indicates the current flight mode, Status: indicates whether the model is “impoverished” or “disarmed”.
Calibrate Accelerometer: Button for calibrating the acceleration sensor
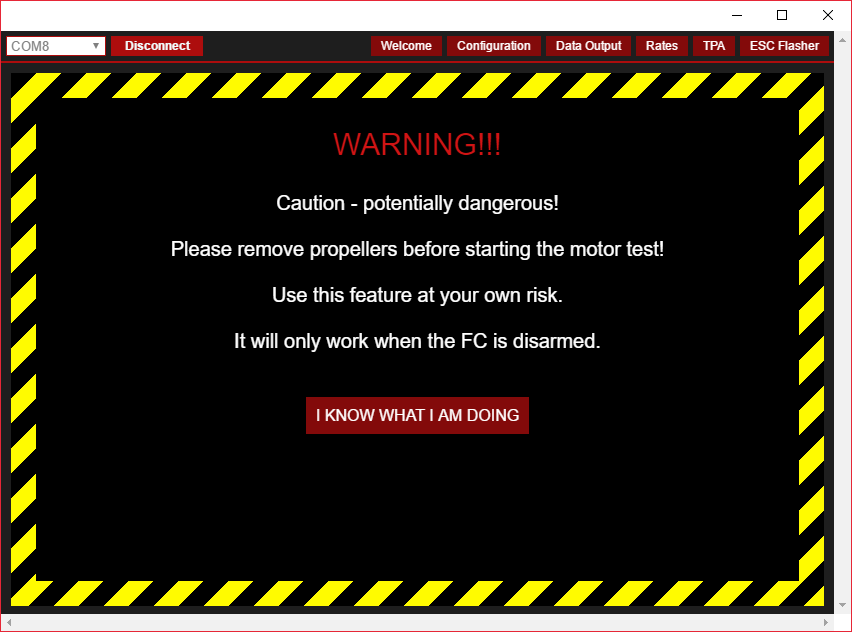
Motor Test
In the “Motor Test” you can do this by clicking “Test” under “Motors”.
Caution: Always remove the propellers when working with a plugged LiPo on the flight controller.
Tab: Rates
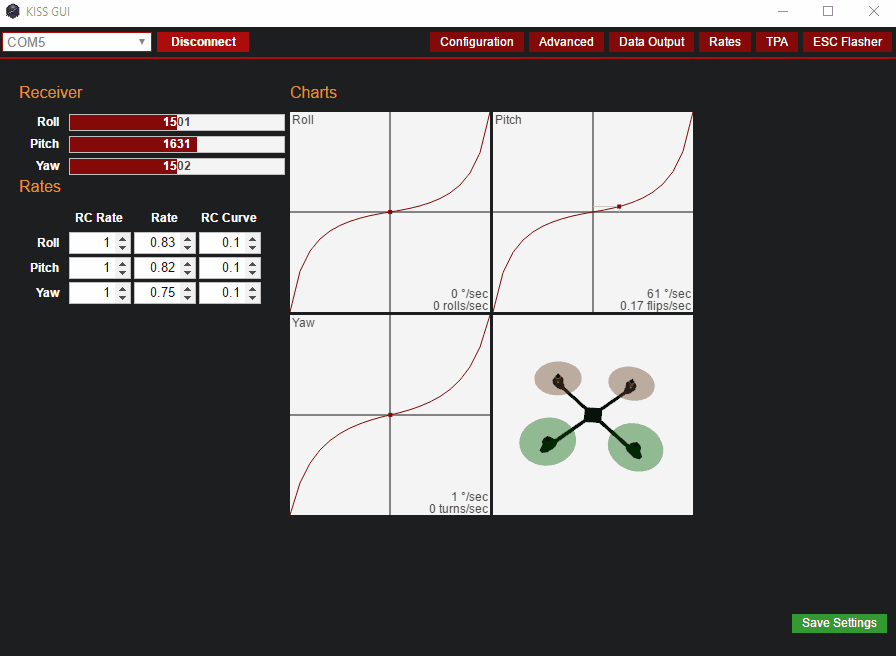
In this window, you can set your advice and test the same. You will also see the current number of flips, rolls, or turns on each axis.
Tab: TPA
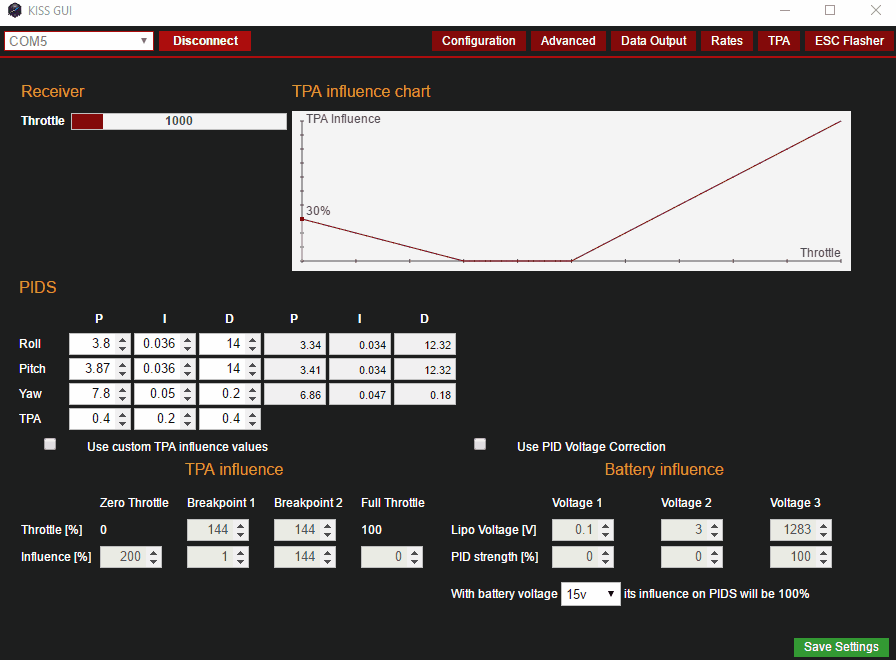
In this menu, you can automatically adjust (increase / decrease) your PIDs according to your throttle and / or battery voltage.
TPA Influence
Here you can adjust the TPA curve for your gas channel.
PID Voltage Correction (Battery Influence)
Here you can have your PIDs automatically adjusted to your LiPo voltage.
Tab: ESC Flasher
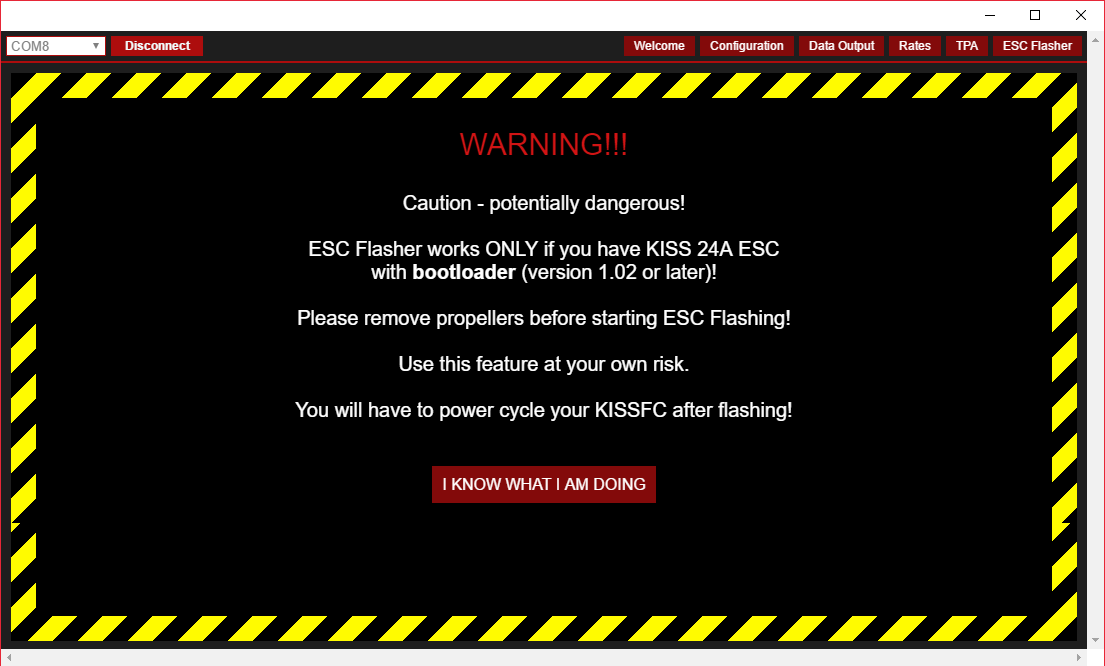
With the ESC Flasher it is now even easier to flash your KISS24A ESCs. You need ESCs with at least version 1.02 to use this feature.
Also here is absolutely essential: Propellers off!
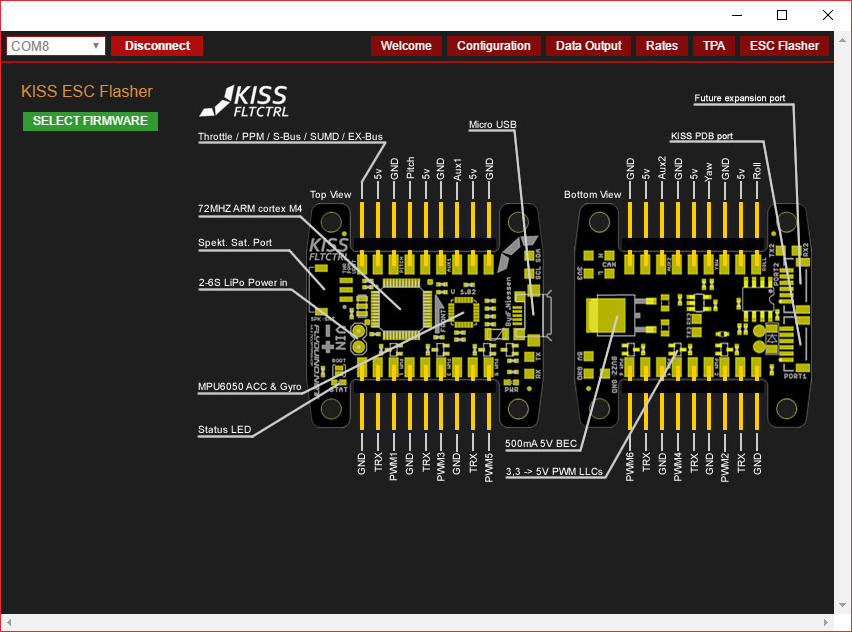
Under “SELECT FIRMWARE” you can now select your firmware, which you want to flash.
Big thank you to Seidel Philipp from blog.seidel-philipp.de


Advertising