Overview of the new p3 ground station functions
First things first…
You MUST be in the air with the Phantom before you can initiate the Ground Station function. Mapping of Waypoints is NOT currently possible OFFLINE ( although saved Waypoint missions can be re-run at a later flight ).
So with that said, start the motors and get it up in the air.
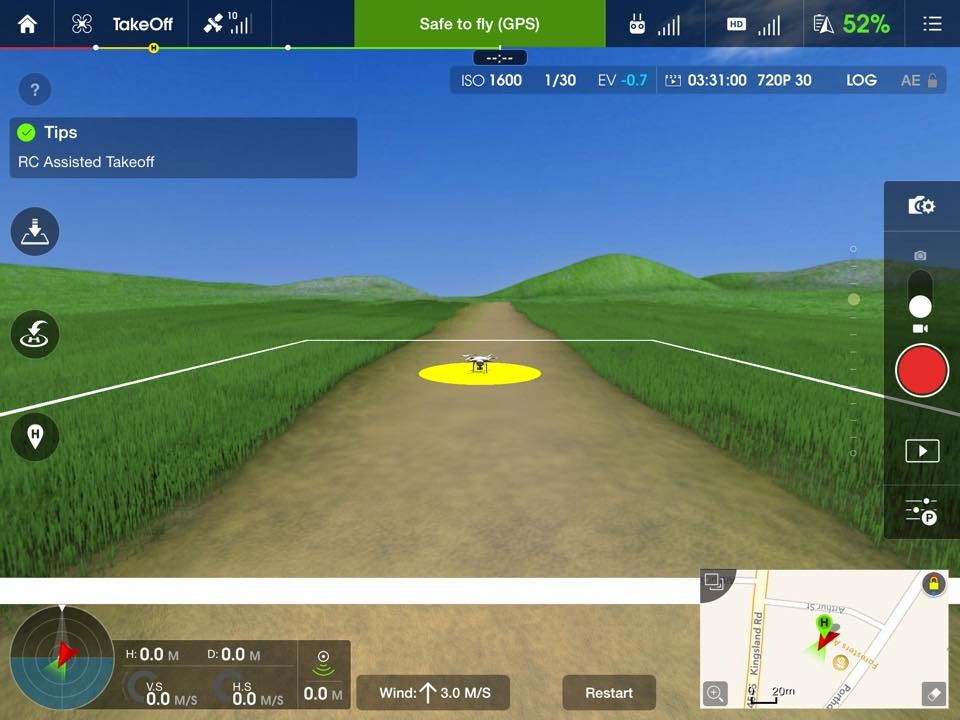
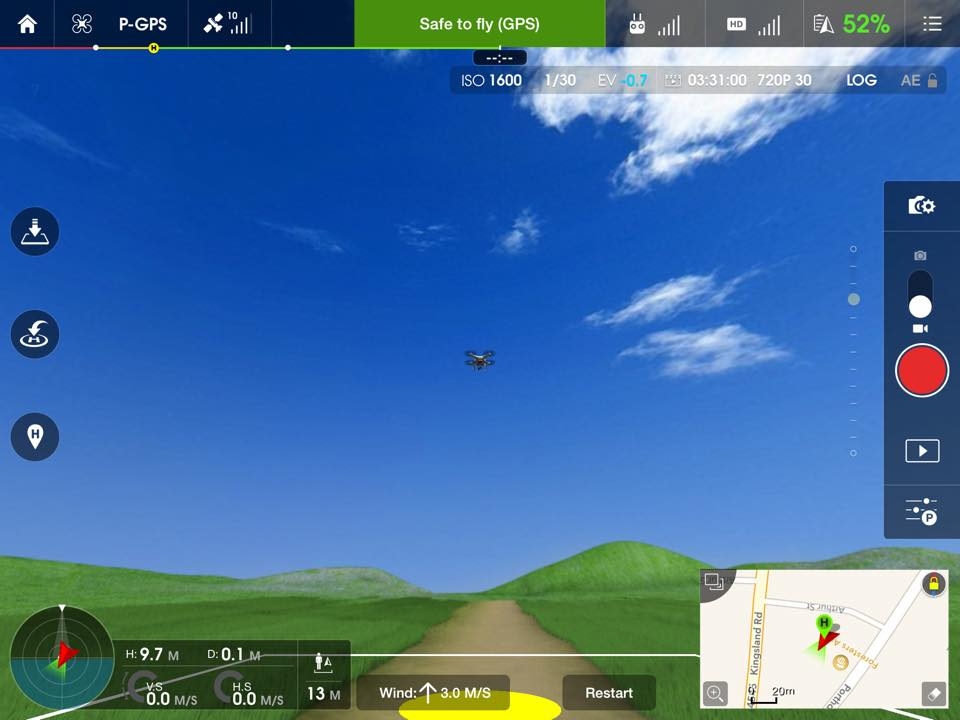
With the P3 in the air you can now initiate the Ground Station function by flicking the Flight Mode Switch to “F”
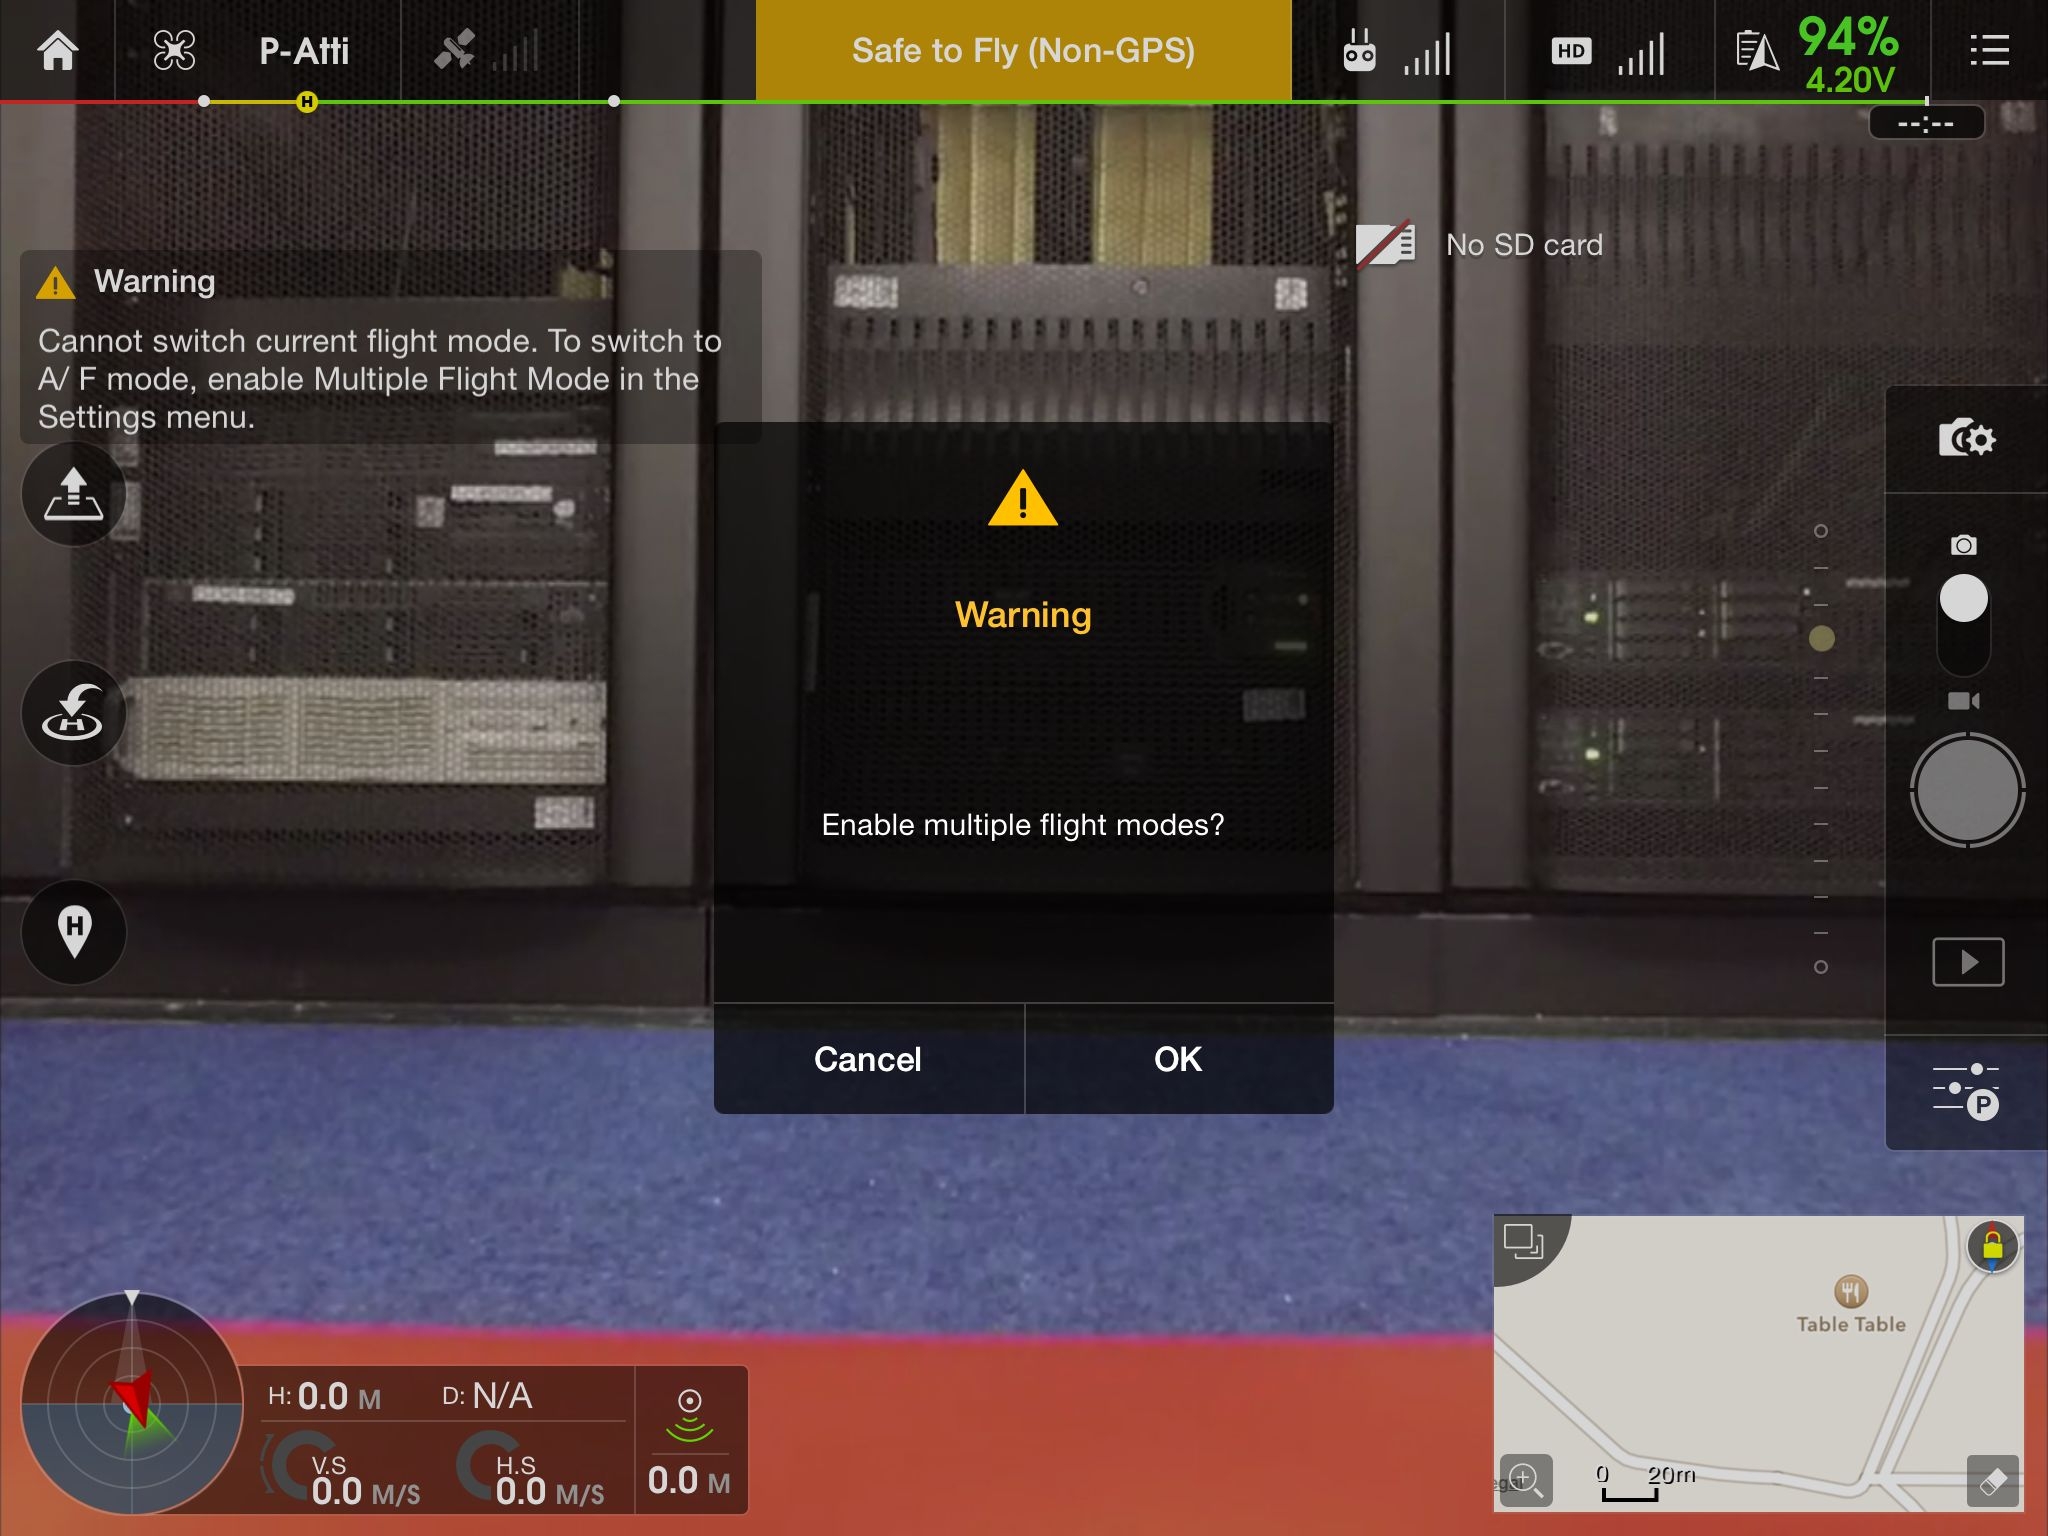
NOTE: If "Multiple Flight Mode" is not enabled, it will prompt for it to be enabled.
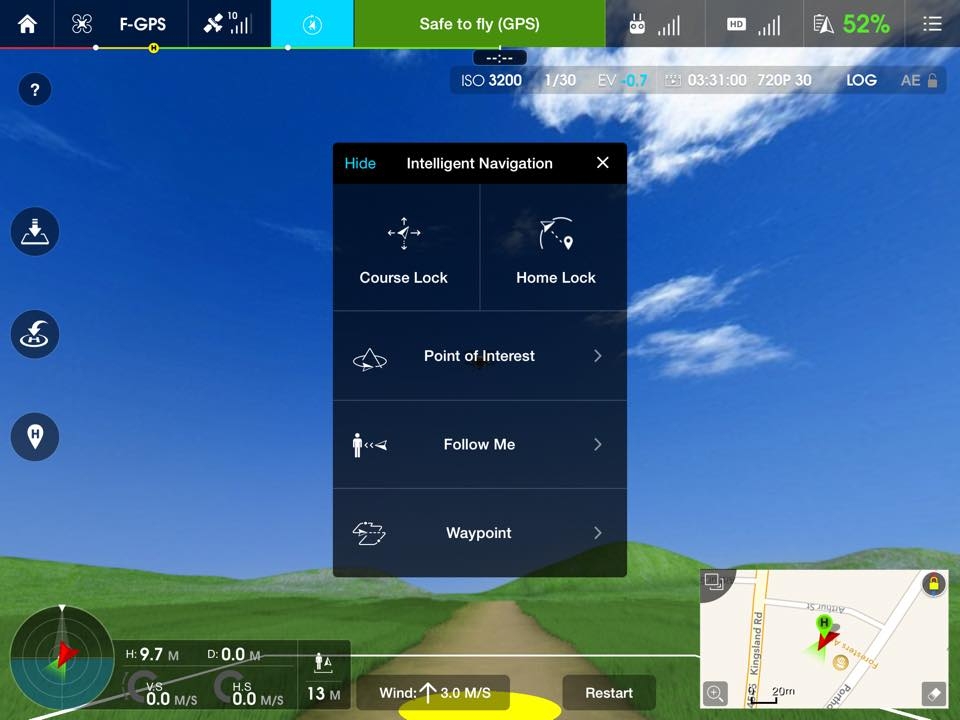
When the switch is moved to “F” the “Intelligent Navigation” menu appears and as well as a new icon to the left of the safe To Fly banner.
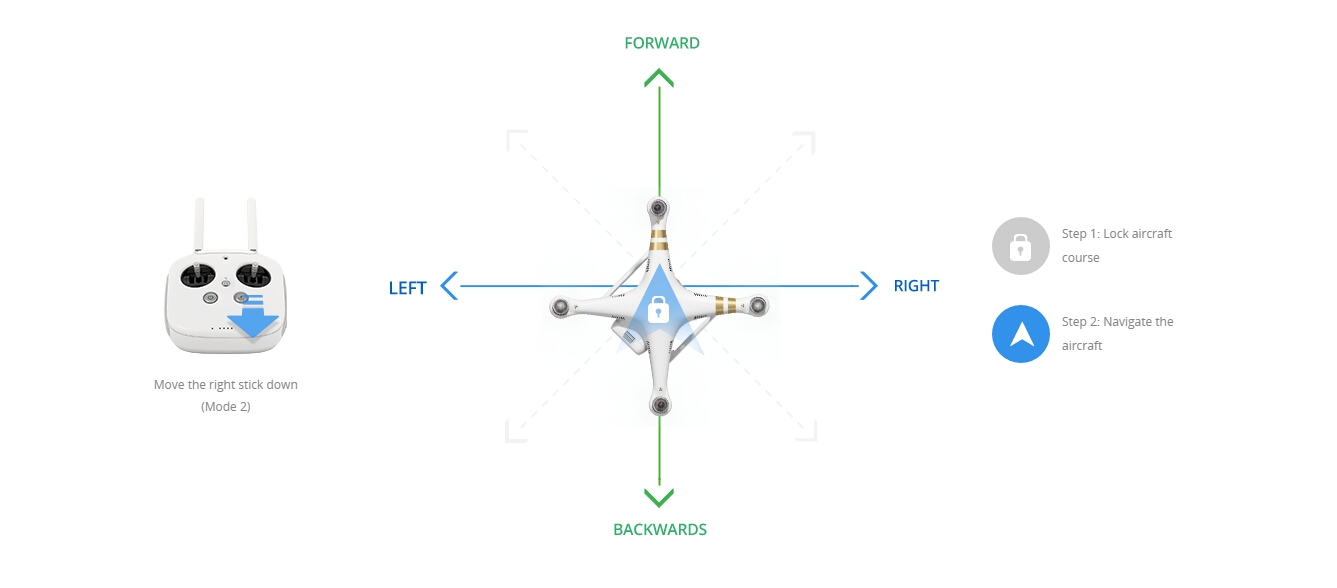
Course Lock.

Easily fly along a set path by putting your platform into Course Lock, which sets all flight controls to directions relative to its current heading.
To enable Course Lock function, select "Course Lock" from the “Intelligent Navigation” menu.
Once selected, you will be given a brief overview of how to use it what it does.
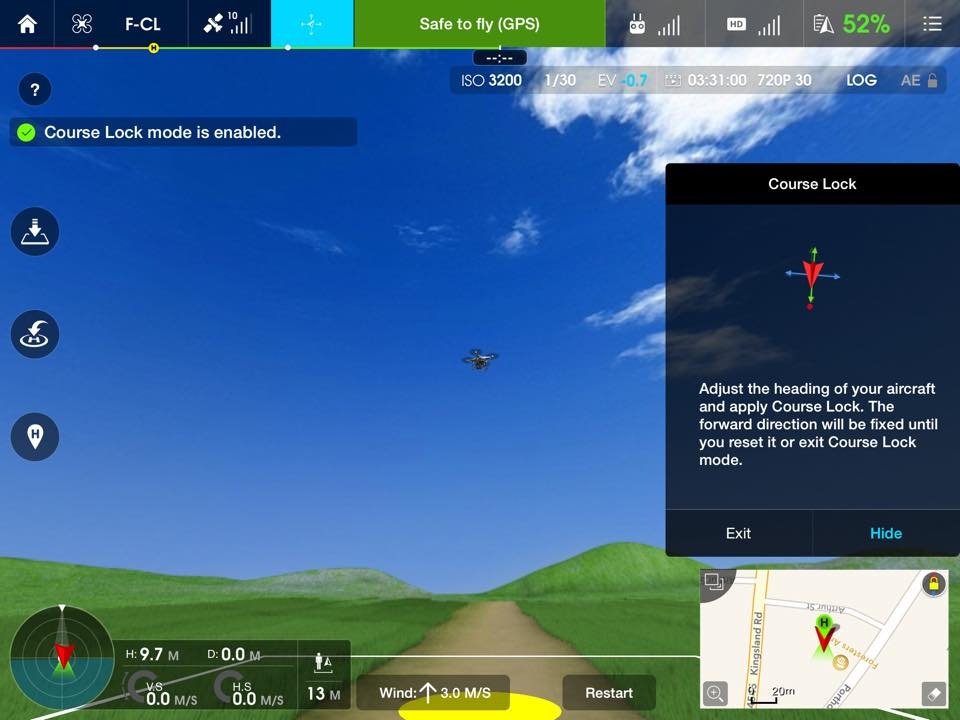
Click “Apply” and it will enable Course Lock. You can hide the menu by clicking “Hide” (bring it back my pressing the icon next to the left of “Safe to Fly”).
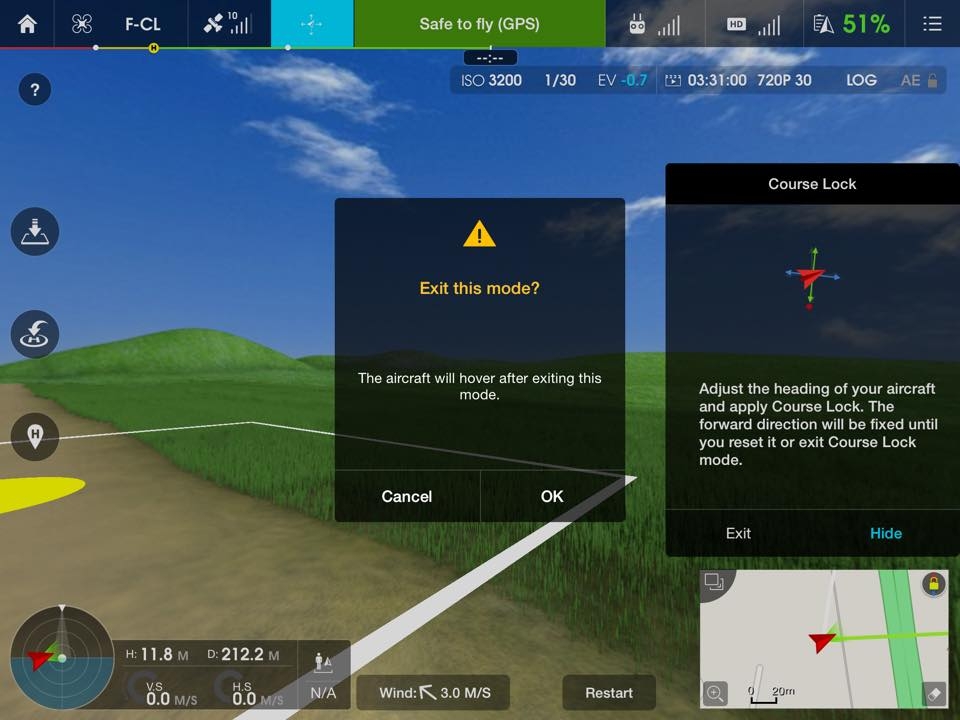
To exit Course Lock, just click “Exit” and confirm this. The Phantom will hover in location once course lock is exited and you will be presented with the “Intelligent Navigation” menu again.
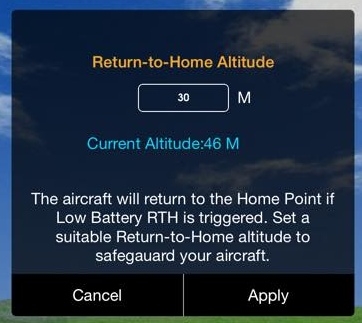
Note: After clicking “Apply” to any Ground Station function, you are presented with a reminder of the current RTH altitude set for the Phantom and a comment stating you should apply a suitable RTH altitude for the planned mission.
In course lock, the recorded nose direction of the Phantom will always be the direction it travels when you push the right stick forwards no matter if you YAW or pitch LEFT and RIGHT.
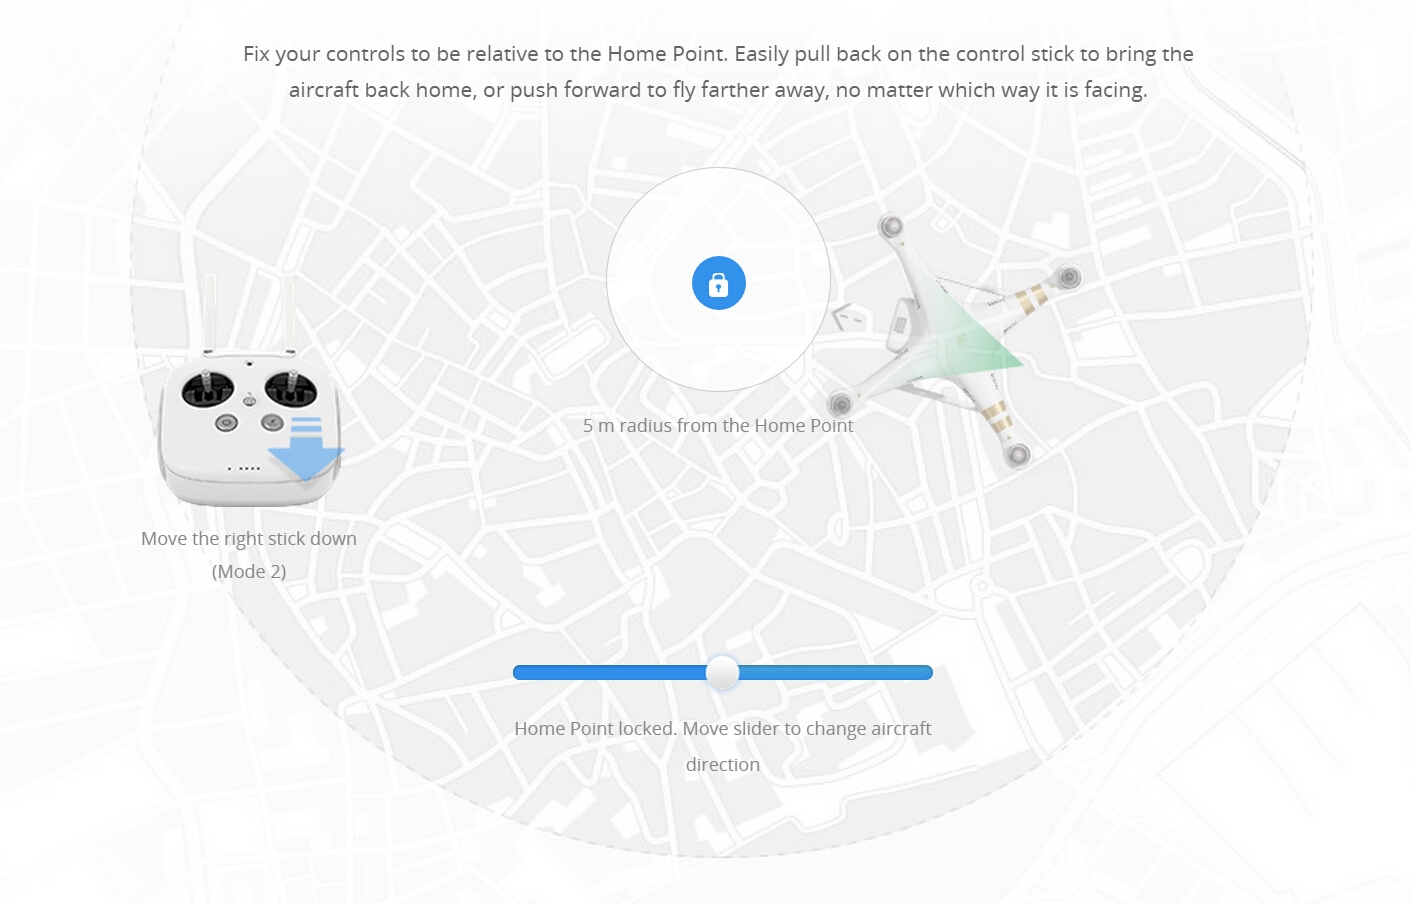
Home Lock
Customize your flight controls to be relative to you at all times. Flick a switch, and forward/backward and left/right flight will be set in relation to the Home Point.
To enable Home Lock, select the option from the “Intelligent Navigation” menu named “Home Lock”.
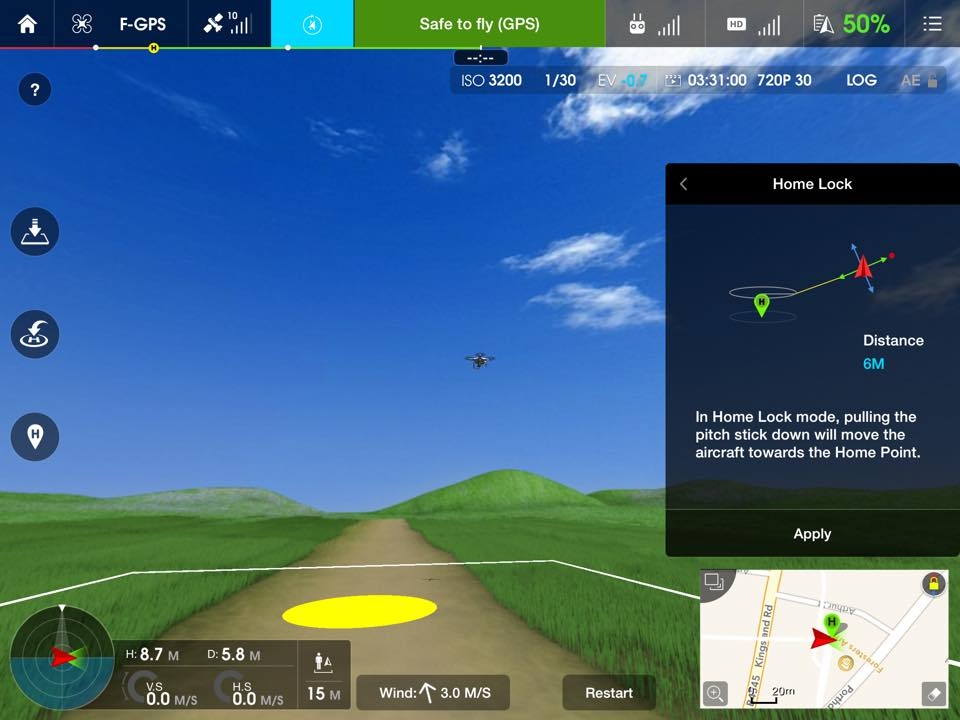
Once selected, you will be given a brief overview of how to use it what it does.

Click “Apply” and it will enable Home Lock. You can hide the menu by clicking “Hide” (bring it back my pressing the icon to the left of “Safe to Fly”).
To exit Home Lock, just click “Exit” and confirm this. The Phantom will hover in location once course lock is exited and you will be presented with the “Intelligent Navigation” menu again.
Note: After clicking “Apply” to any Ground Station function, you are presented with a reminder of the current RTH altitude set for the Phantom and a comment stating you should apply a suitable RTH altitude for the planned mission.
In Home Lock, when you pull the pitch stick down, the Phantom will always head towards the recorded home point no matter of its nose orientation. You can still pitch LEFT and RIGHT but this will only cause the Phantom to either arc clockwise/anticlockwise towards or away from the home point depending on if you are pulling the stick down or pushing it forwards.
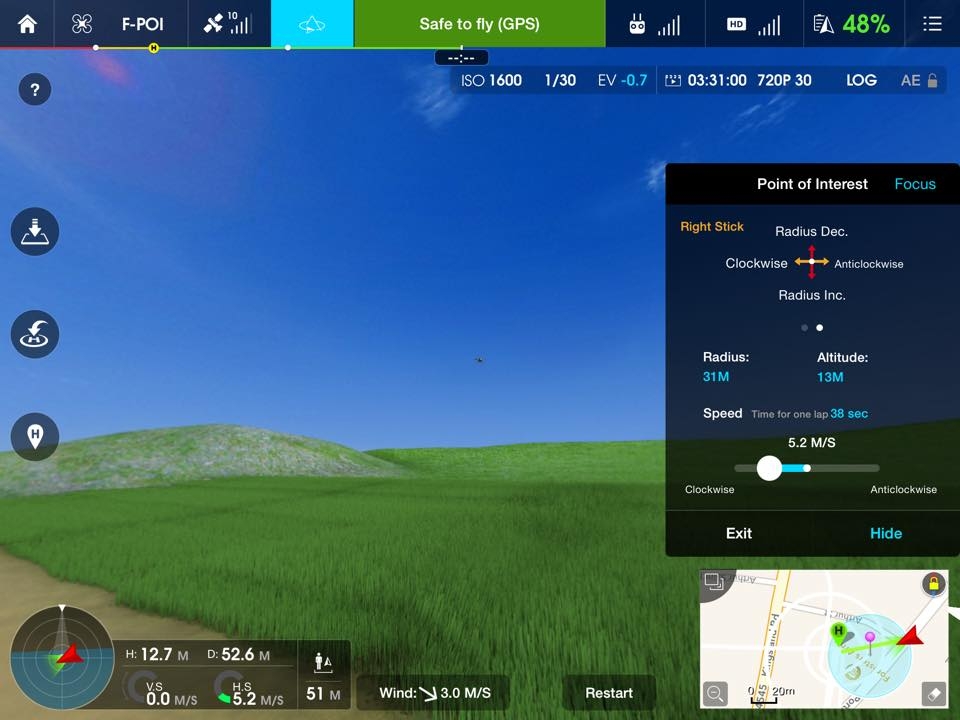
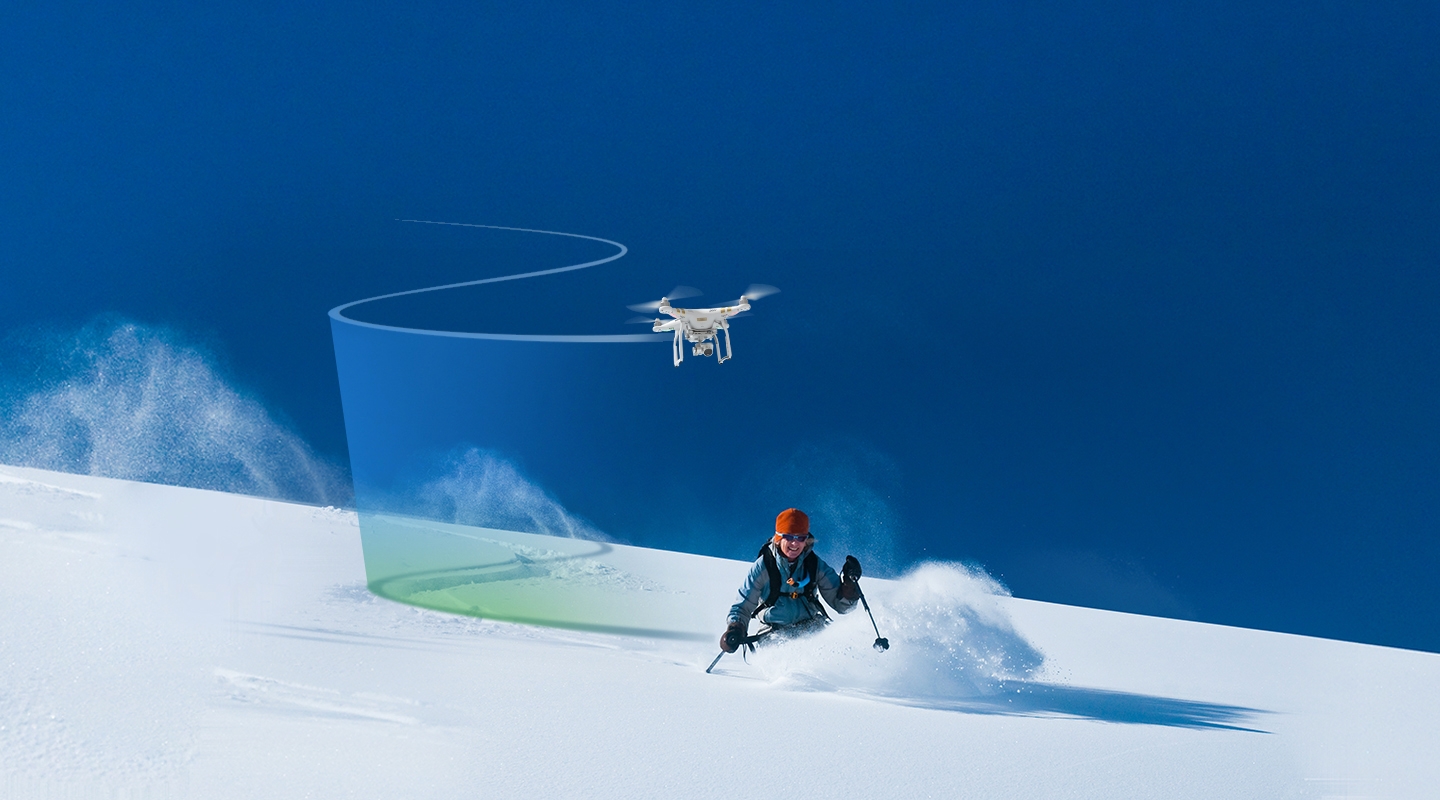
Point of Interest.

Tell your Phantom 3 or Inspire 1 to automatically revolve around a designated object, person, or place in a perfect circle. Automatic and customizable, get shots that only experts could before.
To enable Point of Interest function, select "Point of Interest" from the “Intelligent Navigation” menu.
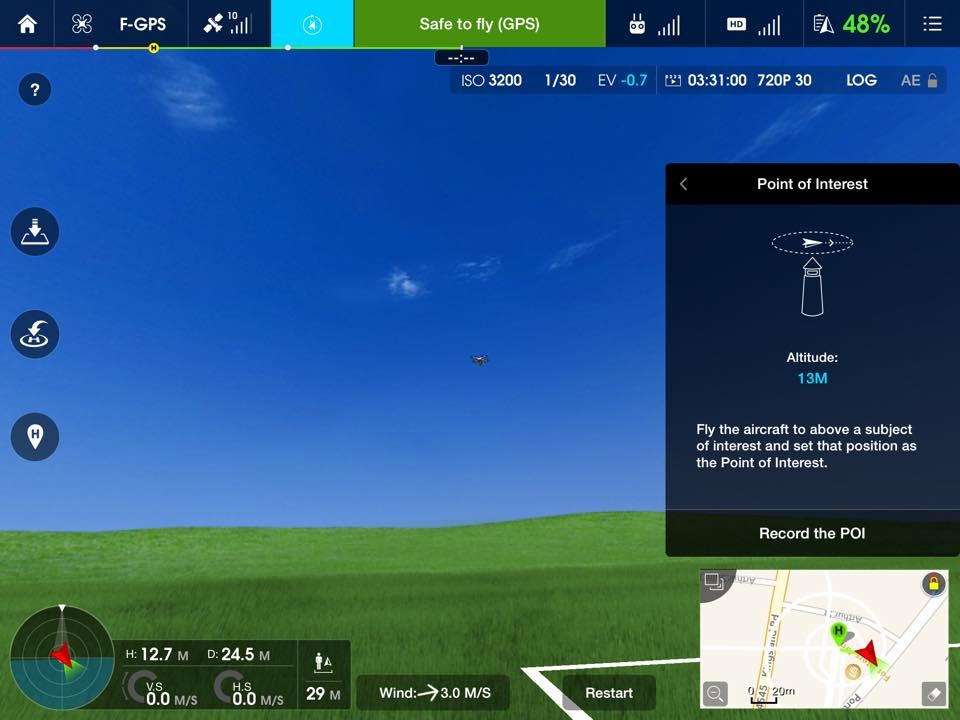
Once selected, you will be asked to fly the Phantom directly above the POI you wish to capture. It will also show you the current altitude above the POI. When you are above the subject, click “Record the POI” button. Its a good idea to hover over the intended POI to determing the point it will record. Enable the grid option on the camera to have a better understanding of where the center is.
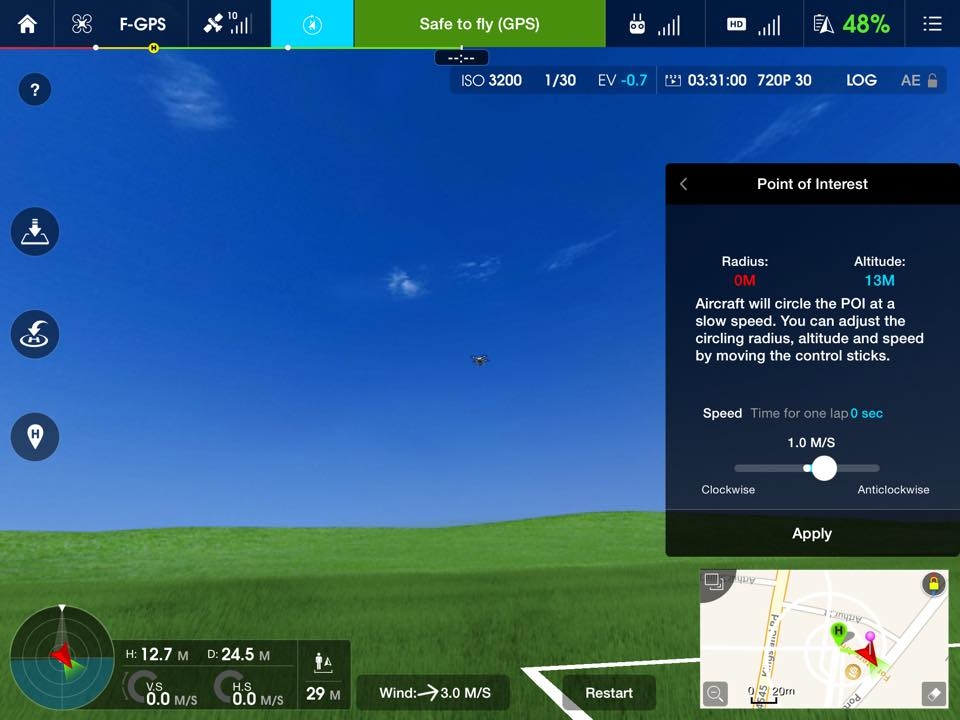
You will now be able to select the circling radius around the POI (must be over 5 meters but cannot be more than 500m). Move the P3 to the desired radius. You can also adjust the altitude here too.
After selecting the radius, choose a speed you want to Phantom to travel at either clockwise or anticlockwise by sliding the slider left or right. Notice that it also tells you how long it will take the P3 to complete one orbit of the POI. Once ready click “Apply” and the P3 will begin orbiting the POI.
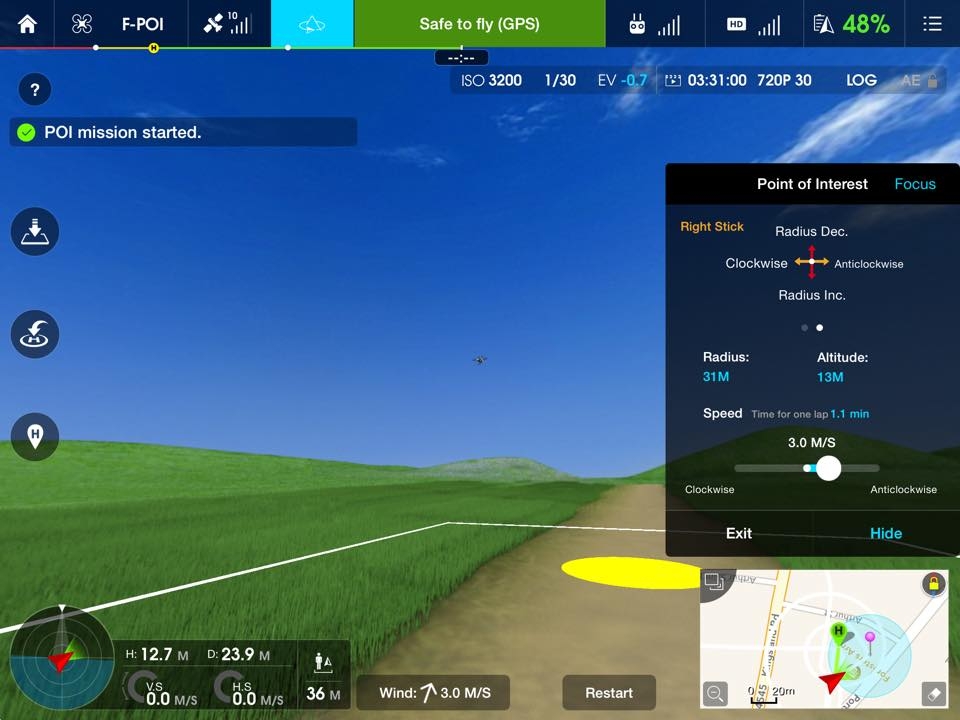
Note: After clicking “Apply” to any Ground Station function, you are presented with a reminder of the current RTH altitude set for the Phantom and a comment stating you should apply a suitable RTH altitude for the planned mission.
Once the P3 is orbiting the POI, you can increase or decrease the orbit radius by pulling or pushing the right stick. Pitching left or right allows you to manually control the orbit direction and speed. You can also move the slider on the APP to change the orbit direction and speed (stick pitch overrides the app settings).
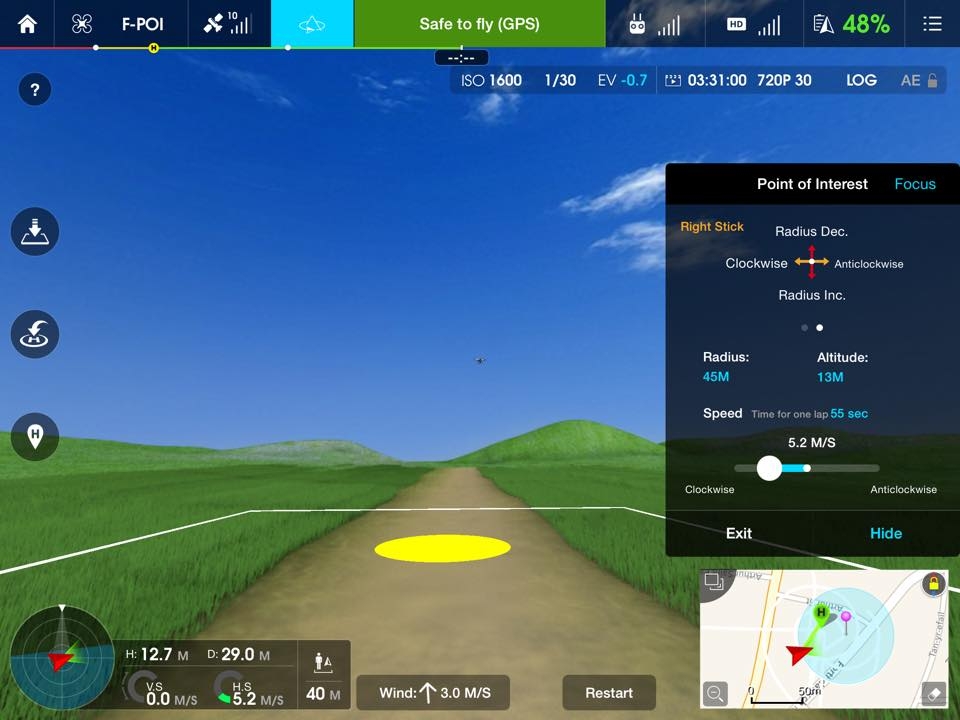
You can control the height and YAW using the left stick. The “Focus” button will return the camera’s focus point to the centre of the radius (your POI).

During POI you can also use the camera tilt wheel to move the camera.
Clicking "Exit" and "OK" will hover the P3 at its current location.
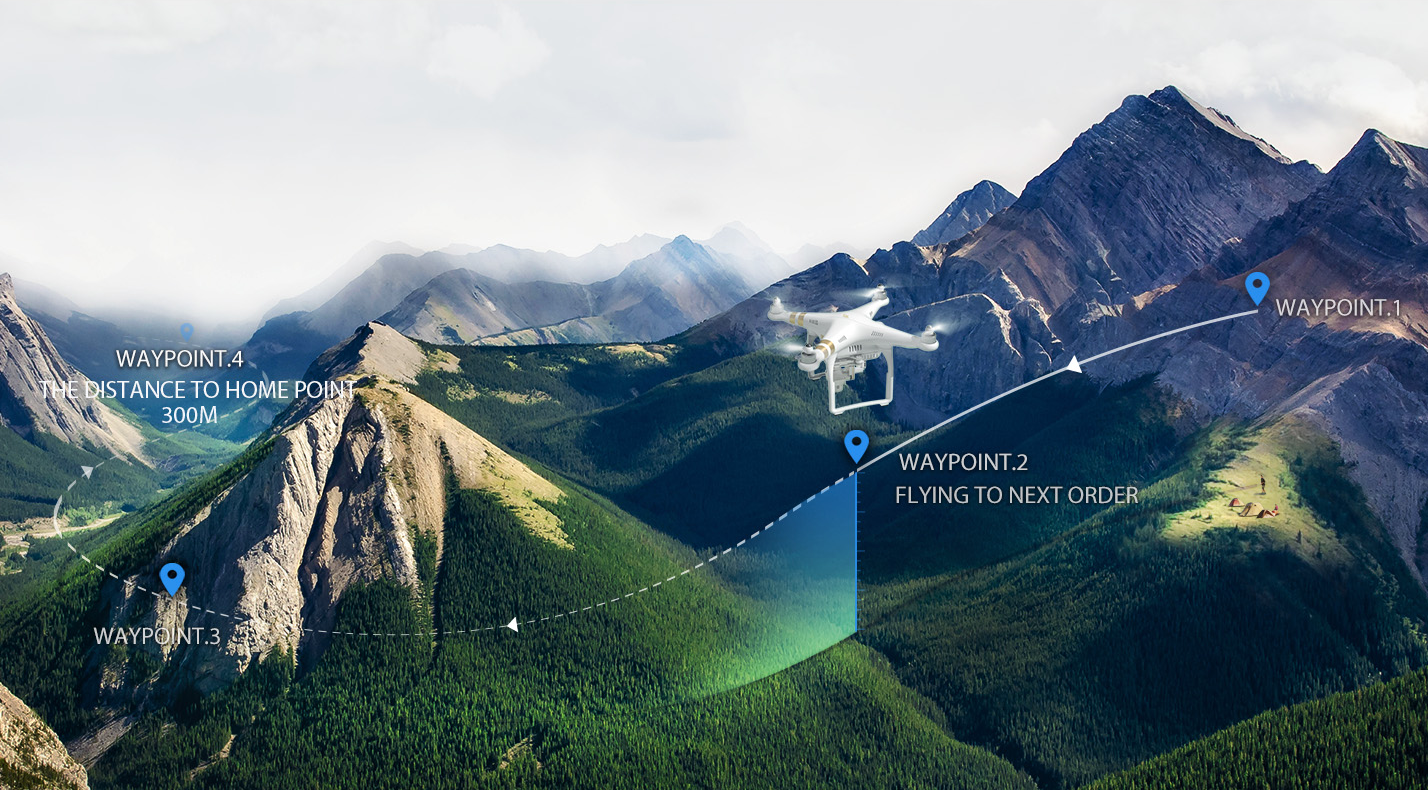
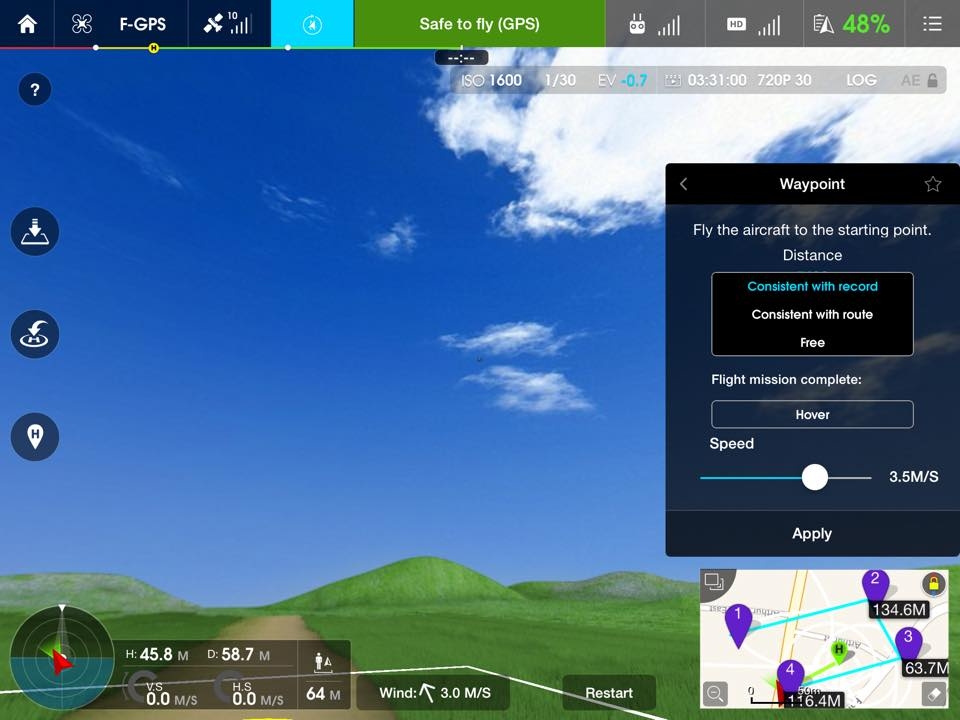
Waypoint.
Record a flight path, then tell your Phantom 3 or Inspire 1 to fly along the same path repeatedly while you control the camera and orientation. Save your favorite missions, customize speed, and more.
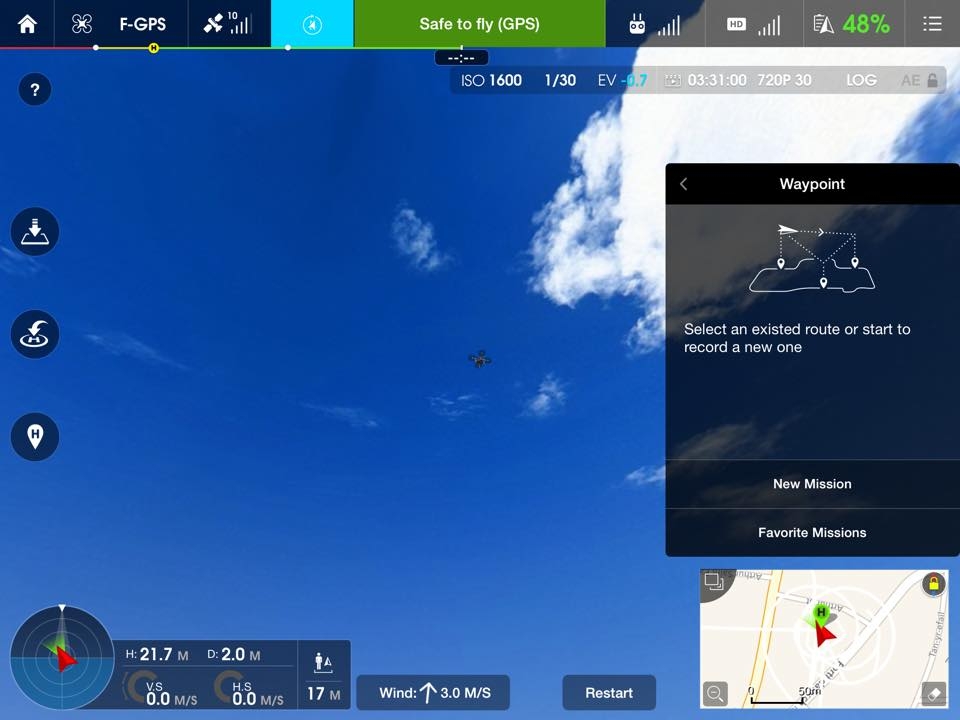
To enable Waypoint function, select "Waypoint" from the “Intelligent Navigation” menu.
You can now select the option to create a new Waypoint mission or load a favourite one (every new mission created becomes a favourite, you can delete them if you wish). For this example we will create a new one.
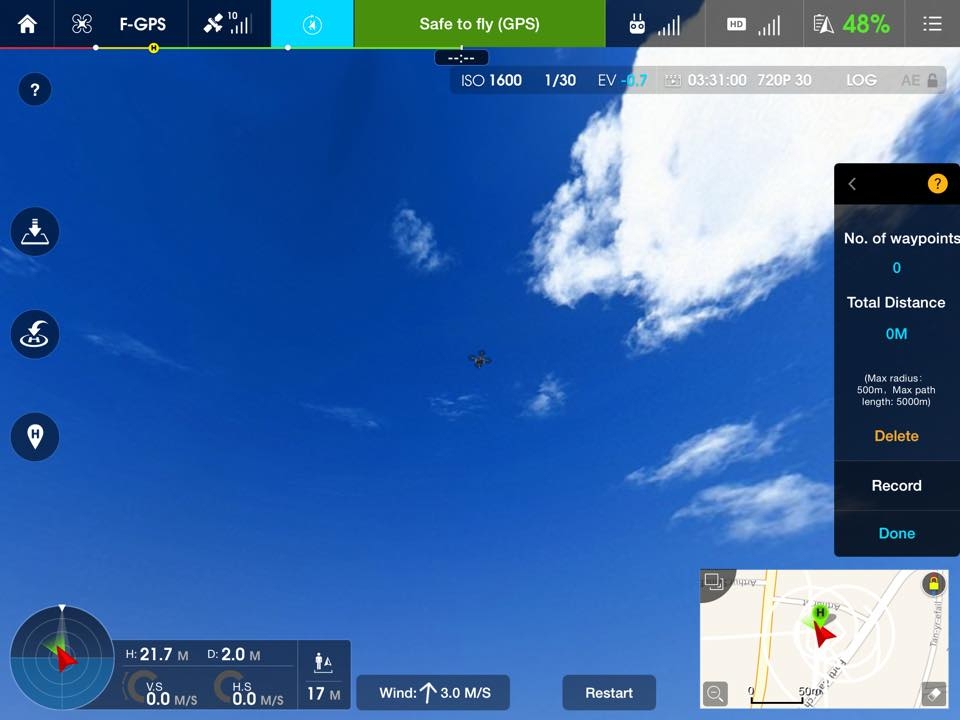
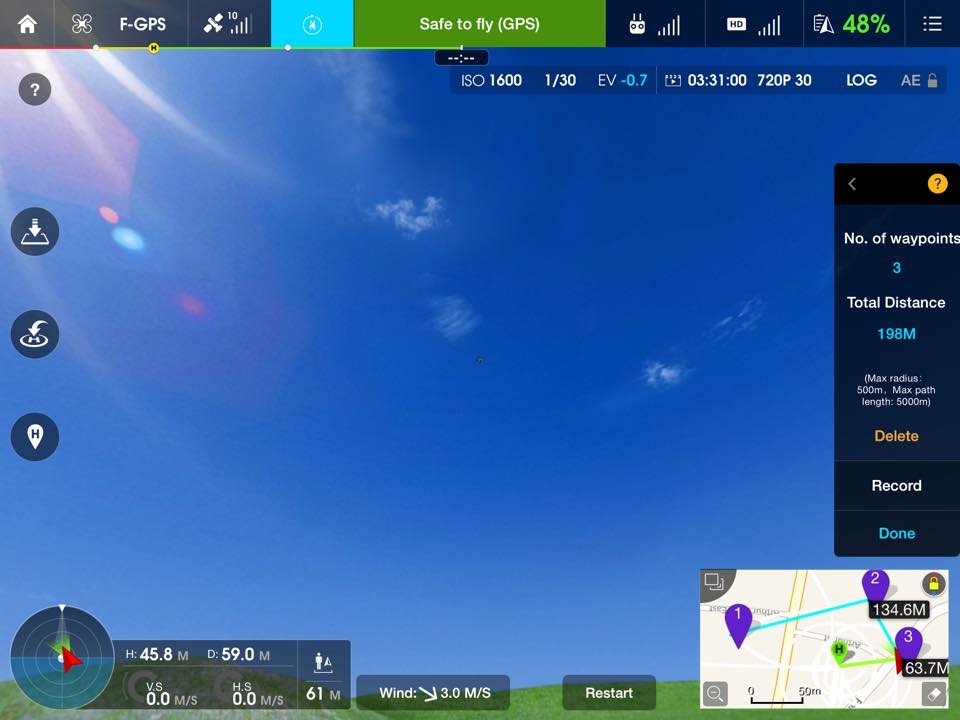
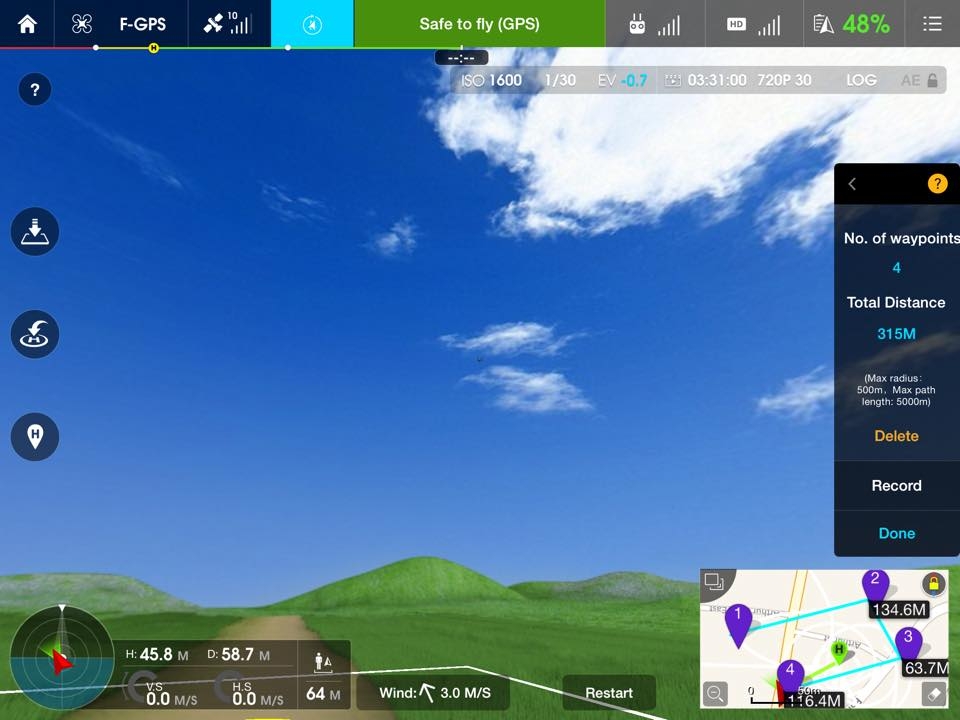
Creating a waypoint is as simple as flying to a location and clicking “Record”. As shown, the maximum radius is 500m and maximum path length 5000m. You can also use the C1 and C2 buttons to add and remove waypoints easily.
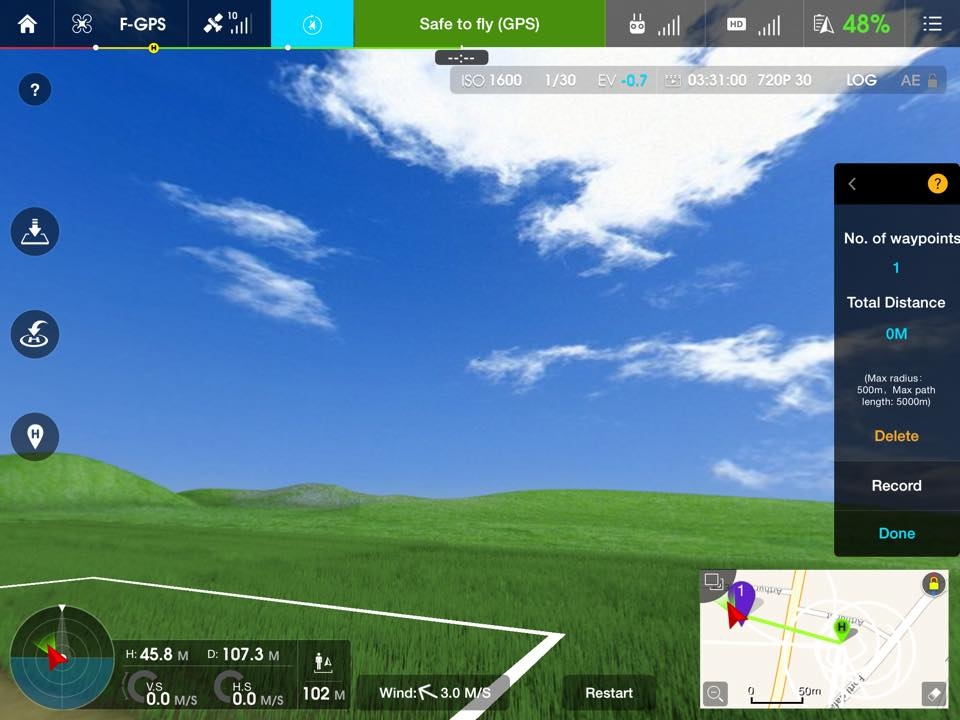
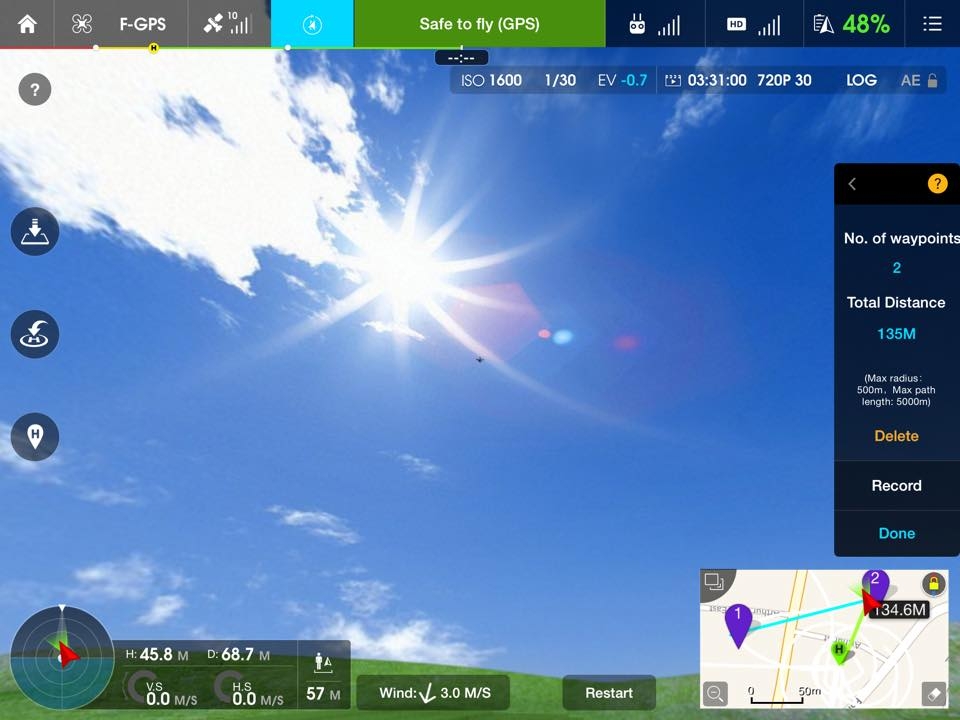
You can delete the waypoints in the order they are created by clicking “Delete” or sing the "C2” button on the controller. Once you have set the waypoints you want, click “Done”.
You are now prompted to fly the P3 to the start waypoint and the distance you are from it. If you just click “Apply” the P3 will first fly to the first marker regardless.
“Head to:” option gives you three options for the where the P3’s nose points during mission flight.
“Consistent with record” will point it in the same direction it was when the particular waypoint was recorded.
“Consistent with route” will point it in the direction of travel along the route.
“Free” will allow you YAW the P3 during waypoint flight.
You also have the option to choose what the P3 does after it finishes the mission. Hover in in its location or return to the home point. Below this you can set the speed the P3 travels at during the POI mission.
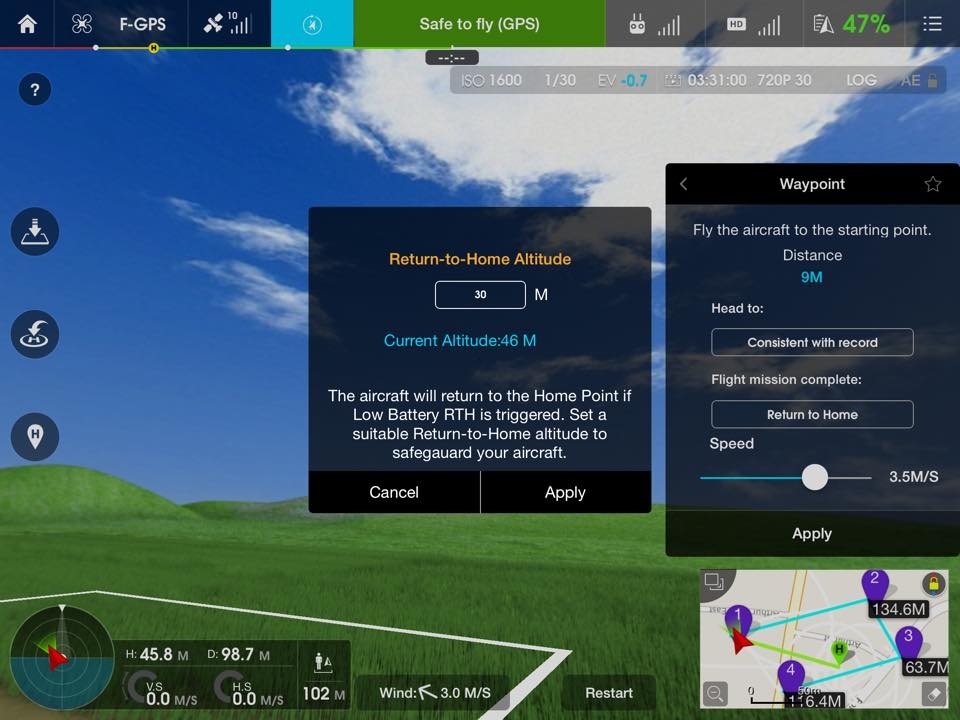
Clicking “Apply” brings up a warning informing you of the current RTH altitude if you chose “Return to Home”. If you choose “Hover" you do not see this message.
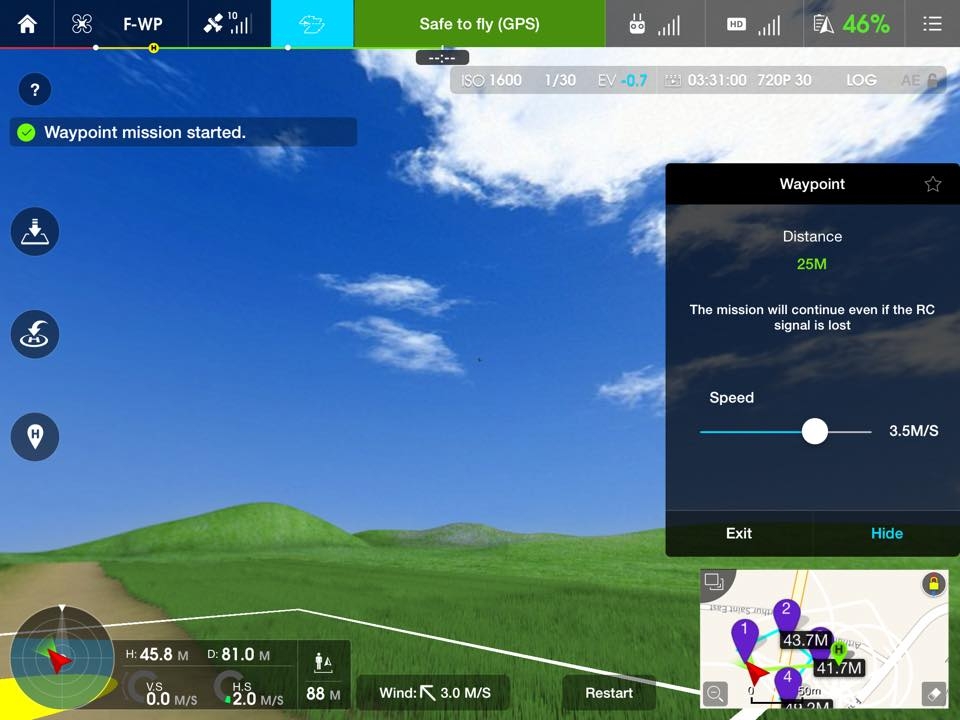
The mission uploads to the Phantom and the mission starts.
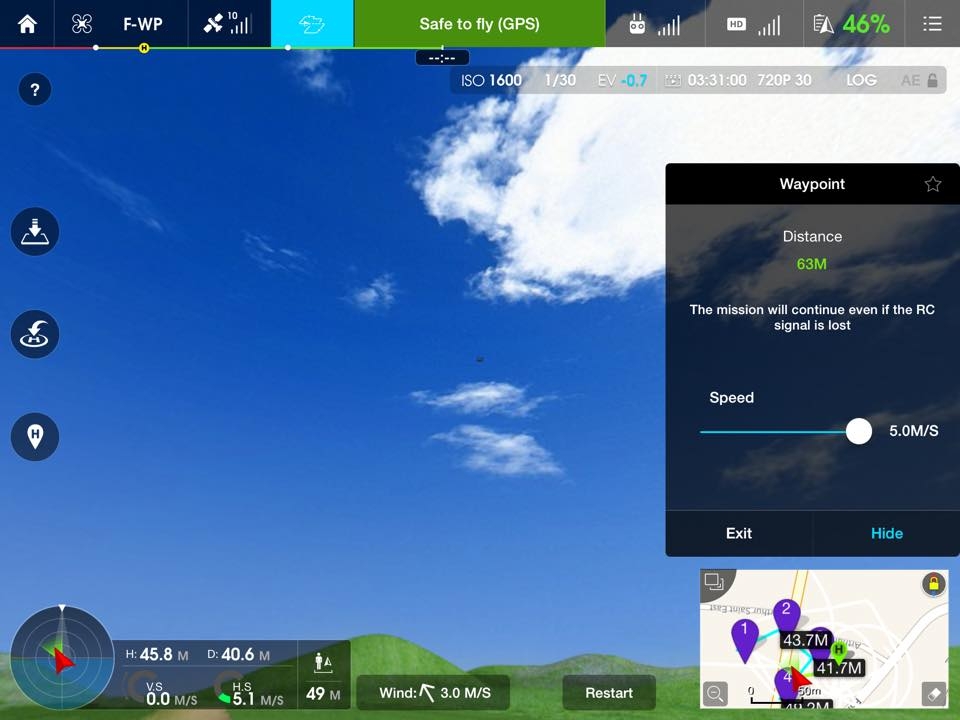
During the mission, you can control its speed using the slider.
Clicking “Exit” will end the current mission.
INFO: Favourite waypoints can be "re-flown" at a later date.
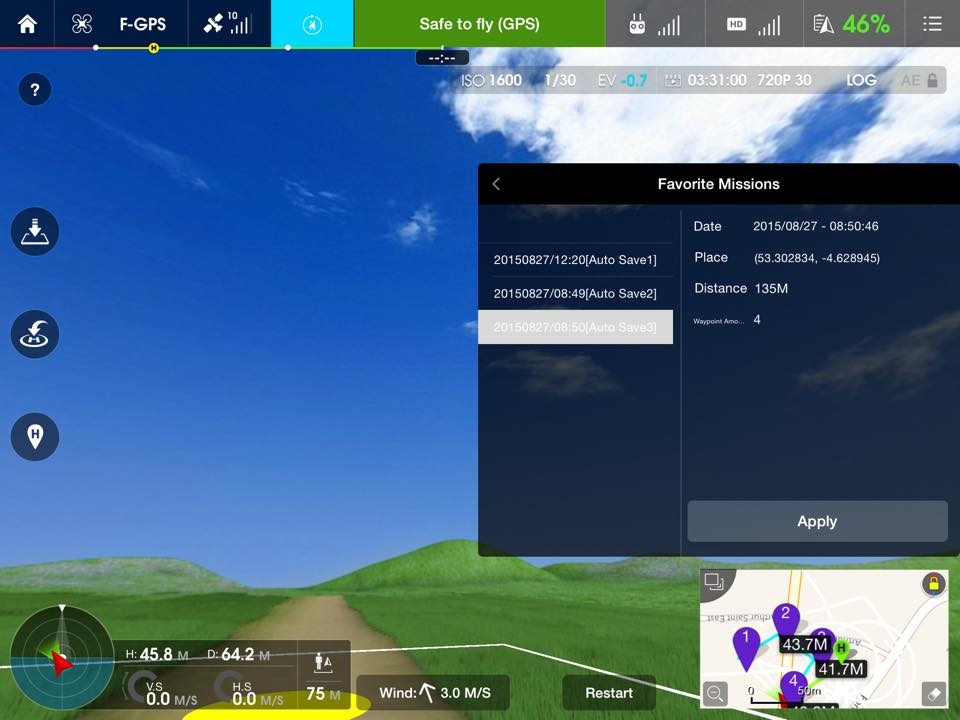
Favourite Missions.
If you select “Favourite Missions” you can re-fly any previous mission flown.
Swipe left on a mission to bring up the delete option.
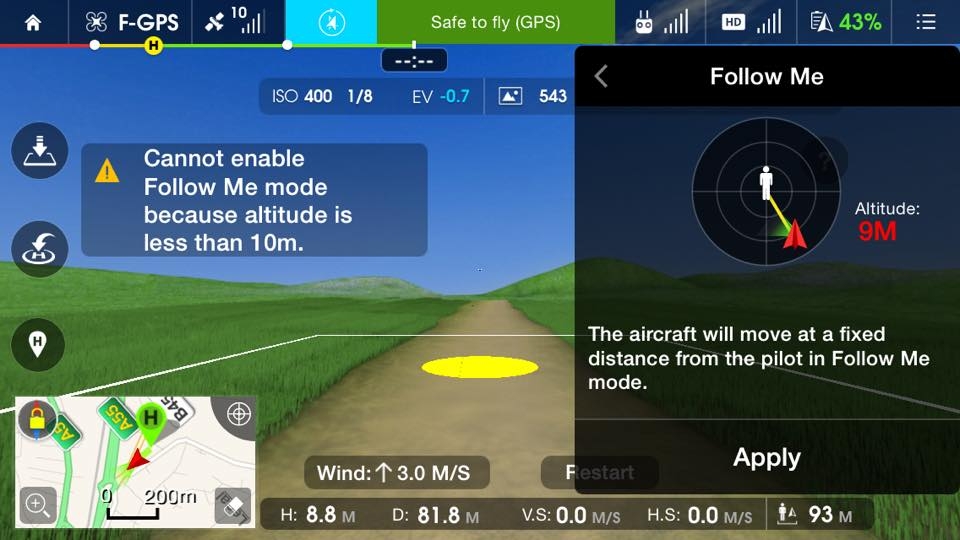
Follow Me.
The Follow me feature does not seem to work in the simulator so I will briefly go over it.
Follow me basically maintains a set distance from you (the iPad with GPS) and follows it about.
One limitation is that you MUST be above 10 meters in altitude or it will not work. The altitude will turn BLUE when its accepted.
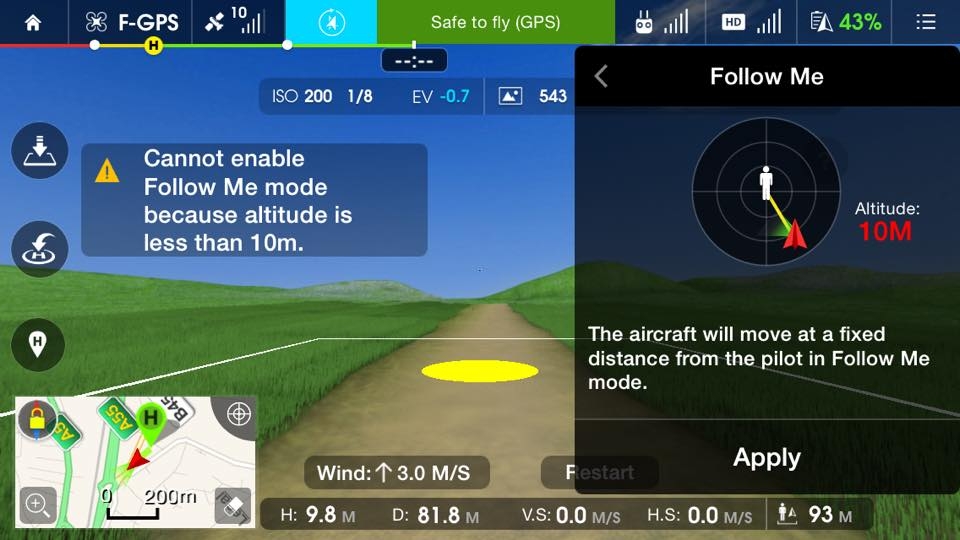
Once you choose an altitude, click “Apply” and the P3 will follow the GPS enabled tablet/phone keeping it roughly cantered on screen.


Advertising